Have you successfully created your website on WordPress? It’s awesome ! After this step, you have surely installed your theme in order to give a face to your platform.
To do this, I strongly recommend that you use a very effective method: import a demo theme. On WordPress, this is a very simple practice to implement that offers considerable benefits.
I then show you, in this article and in the accompanying video, how to import a demo theme into WordPress.
Import a WordPress demo theme
In this video presentation, I will show you step by stephow to import a demo theme
on wordpress:Why import a demo theme to WordPress?
A demo theme: what is it?
Some themes, not all, will allow you to install demo themes in order to visually present your website in different ways.
Indeed, after installing your theme (if you haven’t done so yet, read this guide) you need to think about its presentation and there is nothing better than a demo theme to help you. For themes like Avada, which I use for my Twaino site, you will have the privilege of having a large number of site templates.
These are easy to import and allow you to get a better idea of what you can achieve for your own site. When you go to the theme website, you will be able to view the available demos.

For the creation of my SEO agency Twaino, I used the Avada theme. The default demo theme that is offered is far from the optimal solution for the type of website I plan to have.
To save time, I will import the Avada demo named: Avada SEO. As you might guess, this is a template for an SEO site. The objective is actually to take inspiration from this demo in order to create my own unique and personalized site for my SEO agency Twaino.

The demo theme: why use it?
If you are new to website creation, or if you do not have any knowledge of internet design, I suggest you use a demo since first and foremost, it is a design by web designers of profession.
Therefore, you will rely on their expertise and their knowledge will allow you to have a professional site with a solid structure.
Apart from this fact, you will be able to easily decide the type of site you will have by simply browsing the dozens of demo themes offered.
On the other hand, you will avoid starting from a “blank page”, which will allow you to save precious time. It is obviously much faster to work on something that already exists than to start from scratch.
However, don’t lose sight of the fact that even if using a demo theme will allow you to save a lot of time, you will still have to change a lot of things like I will have to do for my Twaino site.
The final objective remains to create your own website with your services, your colors, your content and your brand image. A demo theme is therefore an accelerator, but not an ultimate solution!
How to find the right demo theme on WordPress?
Personally, when I am looking to install a theme
for a website, I immediately look at what the results could be with demo themes, by going directly to the theme’s website. Indeed, my choice of theme is largely determined by a possible crush on the demo theme. Therefore, I really advise you to consider this as an overall approach.For example, I went directly to the Avada site to view the different types of demo themes available. Note that I chose to use Avada because one of the demo themes seemed particularly suitable to me, and quite close to what I wanted to do.
From the theme site, you can click on the desired template to see how your site will look if you upload this demo site. However, the hardest part is choosing among all these pretty demos.
Consider your industry
To make the best choice of demo themes, you can consider those which have a direct or more or less direct relationship with your activity (photographer, musician, lawyer, etc.). By choosing the one that best suits your activity, you will be able to draw inspiration from it to have ideas for your own site.
In addition to having the appropriate design for the presentation of your offers, you will also have the different sections with the appropriate pages and menus. Even if my SEO agency website will have to be completely redesigned later, this is exactly the choice I made by taking Avada SEO as a demo theme.
Design: a very important aspect
This is inevitably one of the most important criteria when you decide to import a demo theme, as it is also one of the most important aspects for users when they come to your site.
With a nice demo, you will not only be able to see what your site might look like in appearance, but also offer a good site that will help you communicate effectively around the identity of your brand.
How to import a demo theme to WordPress?
You now know how to choose your demo theme, I will now show you how to import this demo step by step into WordPress. Before this step, make sure you already haveinstalled your theme and if you haven’t yet done so, take a look at this article which guides you step by step.
For my Twaino.com site, I opted for the Avada theme which is the best-selling and most popular theme. To do this, I imported the avada.zip file, then activated the Avada theme.
Now I will show you how to import a demo theme to WordPress.
Above all, keep in mind that this import must be carried out with care. Indeed, this operation is likely to erase all of your already existing content and therefore may force you to start from scratch. If you are ready, then follow the following steps.
1) Go to your site’s dashboard
You obviously need to go to the “Dashboard” or dashboard of your site. This is the first thing and for my part, I have to go to that of my SEO agency Twaino. To do this, log in by putting “/wp-admin” after the URL of your site and then providing your connection information.
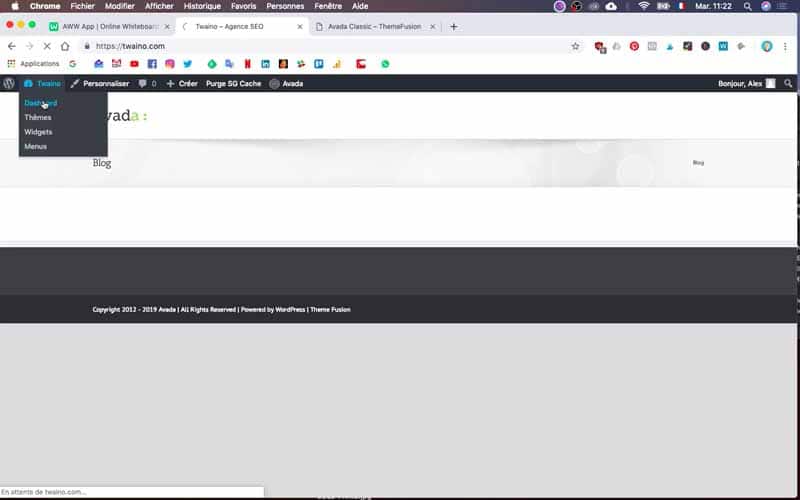
2) Click on the name of your theme
In my case, it is about clicking on Avada which is located on the left sidebar of the Dashboard and in fourth position among the features and widgets.
3) Click on Demo
In the context menu that will appear (as shown in the video), you click on “Demo” to have the same list of demo themes as that found on the main Avada site.
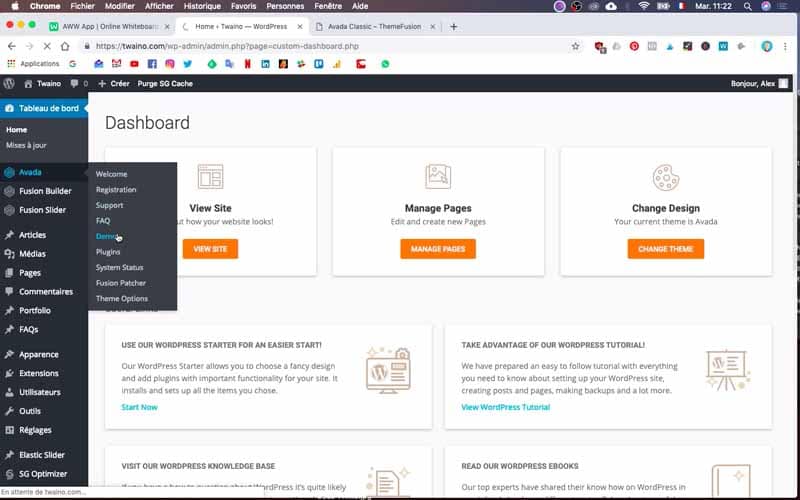
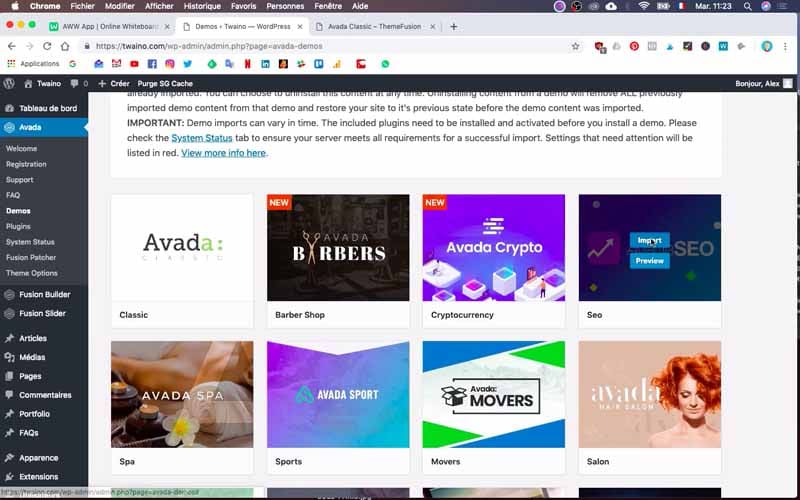
4) Find your demo theme
Once you have the list at your disposal, find the demo you want to install. It will inevitably be on the list. For my site, I find Avada SEO here which I can import.

5) Go to “preview” or “import”
By placing your cursor on the demo theme in question, you will have two buttons. One “Preview” and the other “Import”. If you have any doubts and want to double-check that this is indeed the topic that interests you, click on the first one. You will then have an overview of how your website will look.
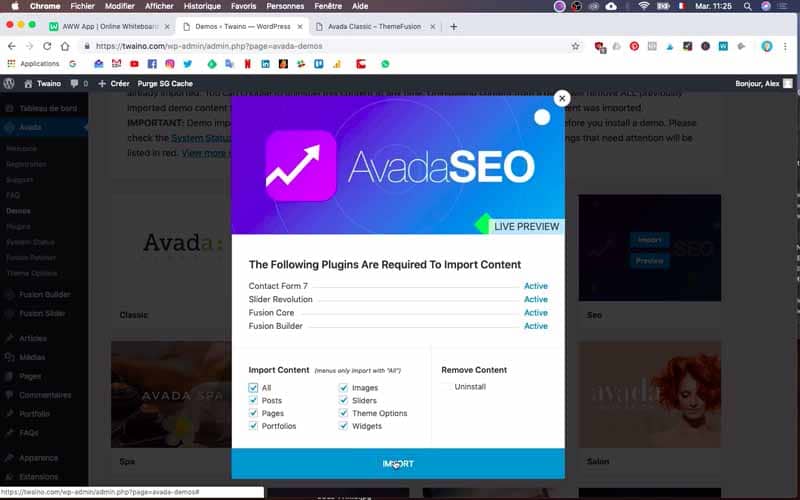
By choosing “Import”, you start the import process. You will then see a menu allowing you to select certain components.
6) Select the components to install with the demo theme
By clicking on “Import”, you will have a menu or a dialog box that allows you to optionally choose the components that will be installed with the demo theme.
For my part, there are some plugins that I can decide to install or not. They are for example:
- “Contact Form 7” for the contact form
- Slider Revolution
- Fusion Core, and Fusion Builder.
These plugins have various uses and will only take a few seconds to activate.
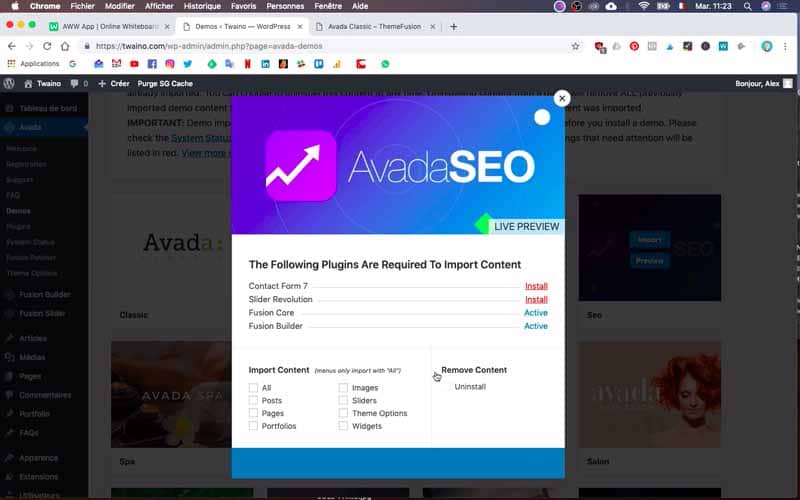
However, it should be noted that some plugins can weigh down the theme and make the loading speed slower. In this condition, you will be able to deactivate them afterwards, and even delete them.
You also have the option to import the entire content (which I will do in my case). These are images, posts, portfolios, pages, sliders, etc. Currently my site twaino.com is empty. Therefore, I am going to import everything onto my site by clicking on “all” in order to have a little more material on which I can work.
If you already have a website with content that you want to keep, you absolutely should not import the entire demo theme, otherwise you risk erasing all of your past work. So be careful to avoid stupid things.By importing everything, you will have size references for the images and the font, which is a good method for creating your own content later. And then, don’t lose sight of the fact that you will have the possibility of deleting unnecessary elements as you go.
To do this, simply click on “All”.
7) Click Import
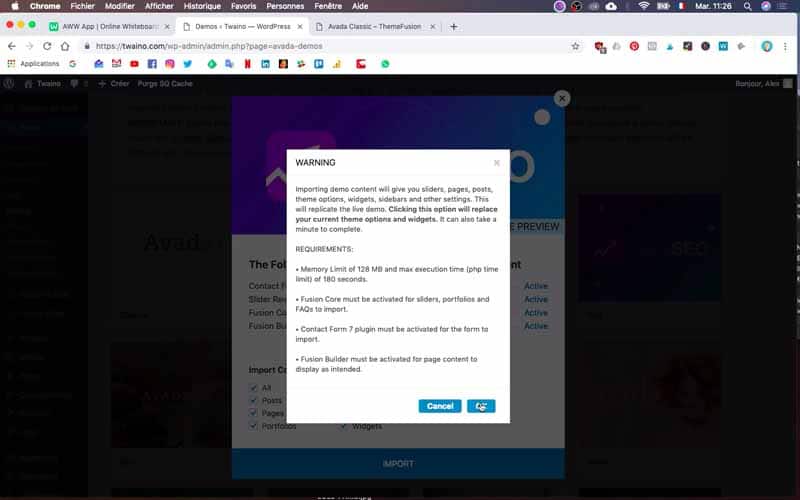
After selecting the components that suit you, you will click on “Import” and you will arrive on a warning page (in my case with Avada). Take care to read this part which generally informs you about replacing all the information already present on your website when installing the demo theme.
For my part, it doesn’t matter since my website is still empty. If this is not your case, be particularly careful to select the best option in your case.
8) Click “ok” or “cancel”
If you decide for one reason or another not to continue installing your demo, simply click “cancel”. Otherwise, select “ok” and the installation will begin.
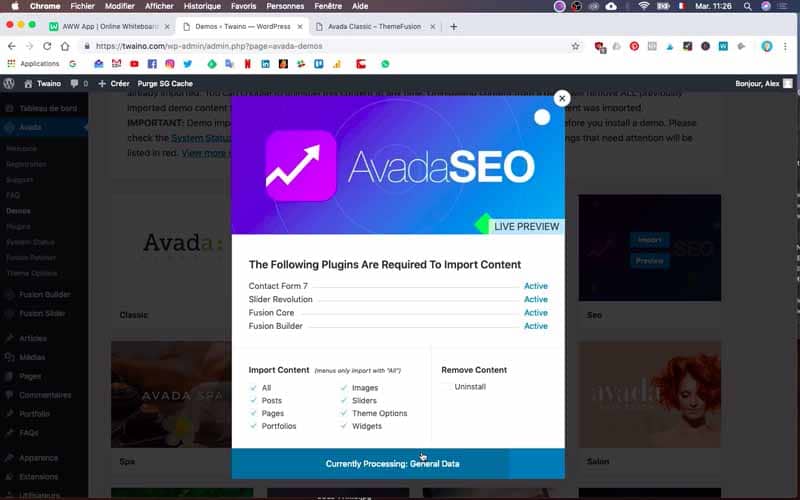
After a few seconds/minutes, the installation will be completed.
9) Go to the home page
In the left sidebar, you will find “Go to site” at the top.
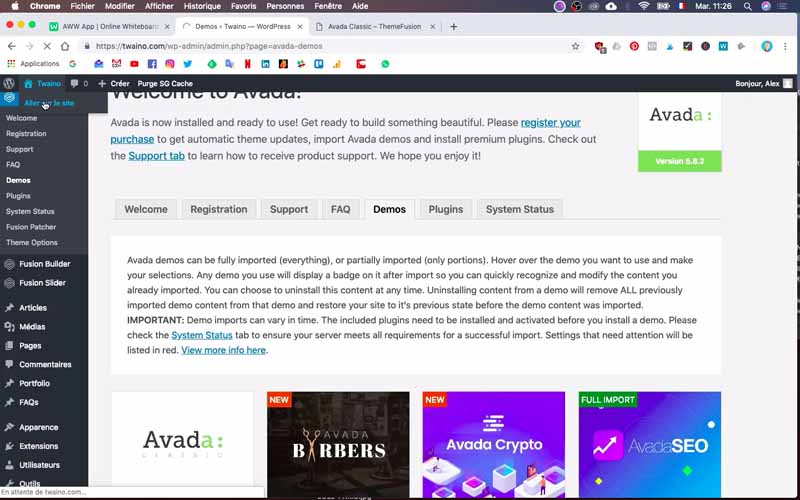
Click on it and you will see that the demo theme has been imported, as well as the content. So you will see for yourself that your interface has completely changed.
And There you go ! Your import is complete and all you have to do is customize your website.

Conclusion
Importing a demo theme remains one of the best ways to quickly have a well-structured professional site with a good design. And to increase your chances of coming across good demos, I suggest you opt for popular themes such as Avada.
Indeed, these themes give you access to several types of demos, designs and sophisticated navigation. It’s up to you to make the choice, but make sure that it comes closest to what you want to aim for.
Once the demo theme has been imported, it will now be time to personalize your site, in order to make it unique for your activity.
See you soon…
FAQ –
What is the point of using a theme directory for websites?
A theme directory offers a wide range of designs and features to personalize your websites. They are often accompanied by support, reviews and regular developments to improve performance and user experience.
What does the expression “import a demo theme” mean for sites?
Importing a demo theme means transferring a pre-designed template of a specific theme to your website. This process saves time in the development phase and provides a solid basis for customizing your website according to your needs.
Are there tools to make website customization easier?
Yes, Elementor and Divi are examples of drag-and-drop tools that simplify website customization without requiring CSS or HTML code. These tools provide maximum flexibility to adapt your website to your requirements.
How to know if a themedemo is compatible with the latest version of WordPress?
Check the theme author ratings and reviews for compatibility with the latest version of WordPress. Most themes explicitly mention their compatibility in the description or technical details.
How to optimize website performance?
Optimize your website’s performance by compressing images, minimizing JavaScript and CSS, enabling server and browser caching, and limiting active non-essential plugin installations. Also make sure that your host offers satisfactory performance to support the growth of your website.


