Fonts are the showcase of your theme. If they’re attractive enough, they can make your website look professional and optimize the user experience.
On the other hand, if they’re too “ugly”, your site can look boring and present a poor user experience.
- So how do you find good fonts?
- How do you integrate them into WordPress?
- How do you change their color and size on WordPress?
If you’ve ever asked yourself any of these questions, then ask yourself and continue reading this mini-guide.
Let’s get started!
Chapter 1: Why use custom fonts and how to add them to WordPress?

1.1. Why use custom fonts for your website?
By default, WordPress offers themes with built-in fonts. While these fonts are excellent and quite nice, integrating them yourself with your own personal touch can present quite a few advantages for the site.
Here are just a few:
- You can customize the theme to your taste
If you’re not exactly thrilled with your site’s basic theme, you can customize your fonts yourself and get a theme that suits you best.

- Set yourself apart from the competition
Customizing your fonts makes your design stand out from your competitors, who make do with the default WordPress fonts.
Many WordPress site owners are content with the default fonts and design offered by the CMS.
In itself, this isn’t a bad thing. However, if you want to differentiate your site from that of your potential competitors, customizing your theme’s fonts is the best solution.
- Your site’s design will improve
If you choose the right fonts, the overall design of your site will get a facelift, which is a big step towards optimizing the user experience.
It’s clear that most visitors will enjoy spending time on an optimized site with a captivating appearance. This is not the case for a site with fonts and a general theme that they get bored of.

So how do you integrate these custom fonts into a WordPress site? That’s what we’ll look at in the next section.
1.2 How do I add custom fonts to a WordPress site?
Here, I present 3 methods for customizing your fonts on WordPress. You can choose between:
- Use web fonts;
- Add fonts manually;
- Host fonts on your site.
It’s important to stress that these aren’t the only methods for customizing your fonts. There are others, but I’ve chosen to show you the most popular and easy-to-access ones.
Let’s see how each of these options works.
1.2.1. Web fonts
Web fonts are the most common method of adding fonts to a website. There’s a wide range you can use to customize the look of your site.
First, let’s move on to an explanation of the term :
1.2.1.1. What is a Web font?
Web fonts are fonts hosted by an external provider. In other words, they are stored on the provider’s website. To access them, you don’t need to download anything.
Simply encode a link to the supplier’s site to retrieve the fonts and use them directly on your site. You can also use an extension to save yourself the ordeal of coding.
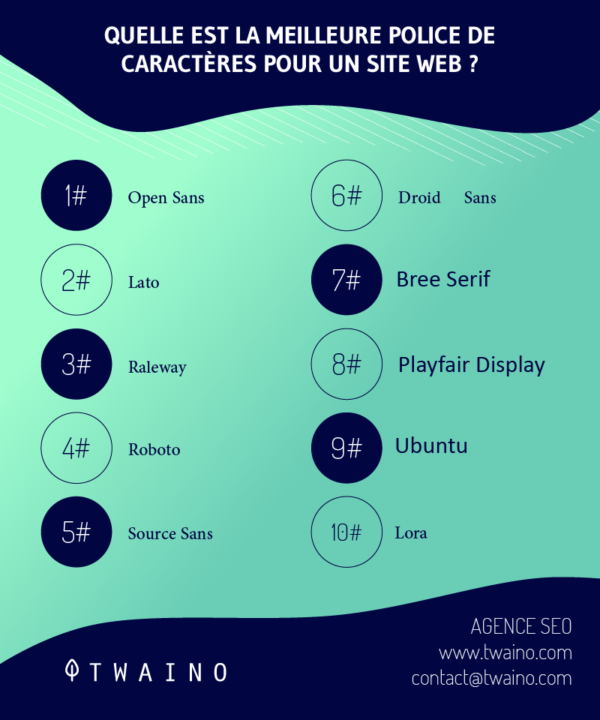
However, it’s very important not to confuse web fonts with web-safe fonts. Web-safe fonts exist as a backup plan. They are only displayed when the site visitor is unable to connect to the font you have defined for your site.
This may be because the supplier’s server is inaccessible, or because the visitor’s browser is obsolete and doesn’t support the custom font.
1.2.1.2. Why use a Web font?
The advantage of using web fonts is that you have access to a multitude of fonts without necessarily hosting them on your site or locally on your computer.
You’ll save far more time creating a few lines of code or installing an extension than downloading and then uploading font files.
What’s more, when the supplier in question needs to make updates to its font range, you’ll have immediate access to the updated versions of the font files you’ve selected.
Quite flexible, isn’t it?
1.2.1.3. Where to find web fonts?
Most popular providers operate without the need for a subscription. However, fonts can be paid for or free, depending on the provider.
The best-known providers are :
Google Fonts is the leading provider of web fonts. It offers an extra-wide range of free web fonts.
You can also save the fonts on your computer and use them for your offline documents, completely free of charge.
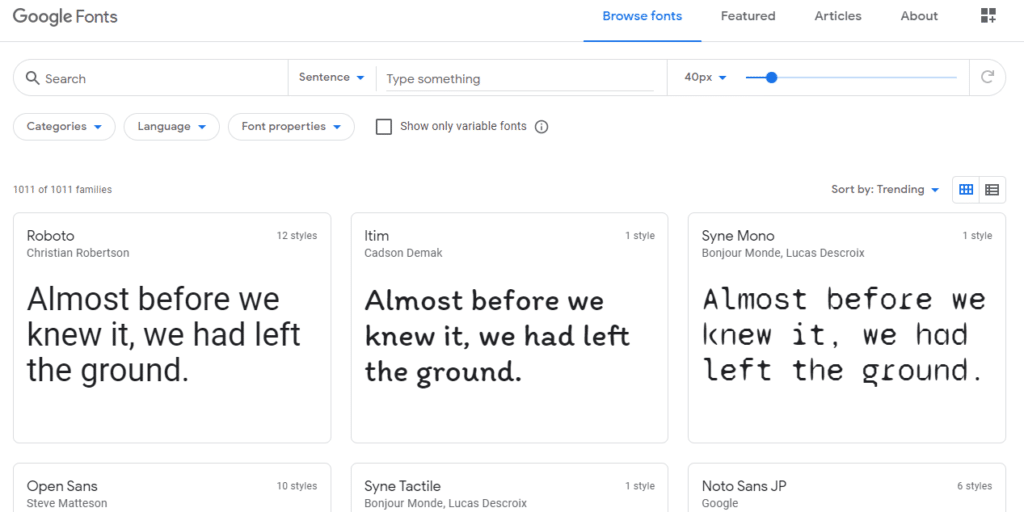
To add web fonts to your WordPress site from Google Fonts, one of the simplest methods is to use the Easy Google Fonts extension.
Simply download the plugin and insert fonts from the Google Fonts “font family” into the typography tab of your WordPress “Appearance” and “Customization” dashboard.
Once you’ve done this, click on ”Save and Publish” to activate your changes.

If you’re looking for high-end fonts, Fonts.com is your best bet. This fee-paying provider offers you top-quality fonts.
Adobe Typekit requires a little more caution than Google Fonts. It’s a market reserved for professional typographers, but amateurs can also find something to their liking.
Adobe Typekit also offers a large number of free fonts for those who don’t want to invest and access the premium options. Access to this font database only requires registration.
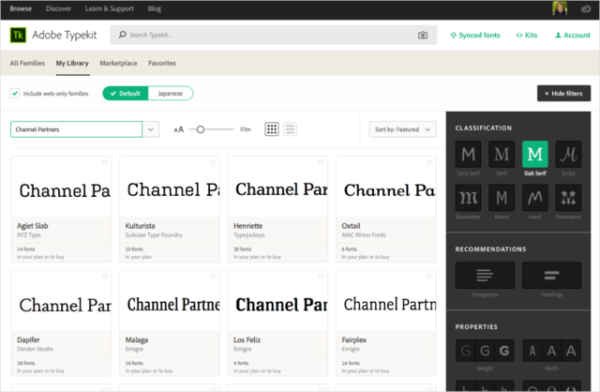
To use Adobe Typekit, go to the search bar from the home interface and search for “kits”.
On the next screen, select the “Create a new kit” option. You will be asked to enter the domain name of your site as the ticket for the next phase.
You will then be provided with a javascript extract which you should save in a small text note on your computer.
Your kit is now ready. Now you can browse the Adobe Typekit collection and add any fonts you like to your kit. The next part is the encoding on your WordPress site interface.
Remember the javascript snippet I asked you to save?
Now’s the time to paste it into your theme’s header.php file in the Appearance and Editor tabs.
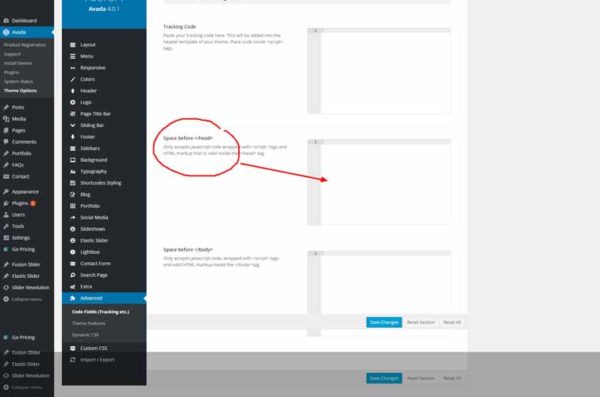
Then click on “Update file” and you’re done. You can add other Adobe Typekit fonts by modifying your style sheet.
As mentioned above, there are plenty of font providers, and we’ve just looked at the most popular ones.
With all these providers, you can directly integrate fonts into your publications by creating lines of code or using an extension you install on your WordPress site.
It’s also worth remembering that providers like Google fonts offer you the chance to preview the result you’ll get once you’ve definitively opted for a particular font.
1.2.2. Add fonts manually
The second option I suggest for customizing your fonts on your WordPress site is to add them manually to your site.
These can be web fonts or fonts you host locally on your computer.
To manually add web fonts to your site, you’ll need to create lines of code for your function sheet and style sheet.
If you’re using a custom theme, modifying the function and style sheets won’t cause you any trouble.
On the other hand, if you’re using a WordPress theme, you’ll necessarily need to recreate your theme.
So let’s take a look at the steps involved in manually adding web fonts:
- Select a font:
First, select a font of your choice and retrieve its link.
- Embed the link to the chosen font:
The second step is to integrate the copied link into your theme’s function sheet. To do this, you need to replace the existing font link in the function file with the one generated by the supplier and initially copied.
You have now queued your font. It will not work immediately. You need to move on to the next step.
- Add the font to the style sheet:
For the font to work on your site, you need to add it to your site’s stylesheet.
To do this, add the code for applying fonts to your style.css file and select the element you want to style (the body of your text or the heads).
Finally, save the modified style sheet and check that your changes work on the site.
If all this sounds complex, here’s a video :
However, it’s also a good idea to add a backup or web-safe font in case any of your site visitors are unable to access the font you’ve applied.
Hence the importance of having an optimized, well-designed and mobile-friendly site. I’ll show you below how to download and convert font files.
1.2.3. Host fonts on your blog
Another way is to host fonts on your site’s server. One of the advantages of this method is that you have a monopoly on the security of your site: no third-party links.
The fonts to be hosted are web fonts available for download from the supplier sites. You still need to check whether the supplier’s site license authorizes you to carry out this type of action.

You can also host fonts locally, upload them to your site and insert them into your style sheet without queuing them in your functions file.
In concrete terms, this means :
- First, download the fonts of your choice from a supplier site. To be able to use these font files on your website, make sure they are in woff format. If necessary, you can use a format converter to make them usable. We’ll come back to this in more detail in the next chapter.
- Next, you’ll need to upload all the font files you’ve downloaded to your theme folder. It’s a good idea to create a subfolder called “fonts” in your theme folder, where all your font files will be stored. It’s one more point in the customization and optimization of your WordPress site.
- Finally, all you have to do is integrate the fonts into your style sheet, following the same process, and watch your site subliminally change its appearance.
Now that we’ve explored these various options available to you for customizing your fonts, I’m going to share with you how to convert your font files.
In order to manually integrate fonts into your WordPress site, you’ll need to download them first and upload them to your site. You also need to ensure that these files are in the right format.
To do this:
- Start by visiting the supplier site you’ve chosen;
- Then select the font you require;
- Go to the “License and use” section of the site to find out whether you are authorized to download and use this font file;
- Click on the “Download” tab and save the zip file locally on your computer;
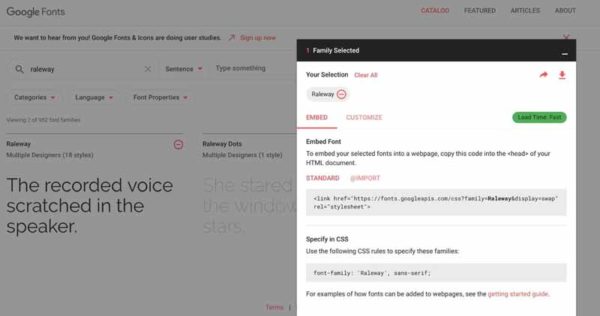
- Then open the zip. file on your computer to extract the fonts. Typically, you’ll find them in WOFF and WOFF 2.0 formats.
Now that you know how to integrate fonts into WordPress, let’s see how you can modify them yourself at any time.
Chapter 2: How to modify fonts on WordPress
2.1. Modifying fonts on WordPress
You can modify your fonts in a number of ways:
- Use the block editor or the classic editor;
- Use the WordPress customization tool;
- Make modifications in posts;
- Make modifications in your style sheet.
2.1.1. The Gutenberg block editor
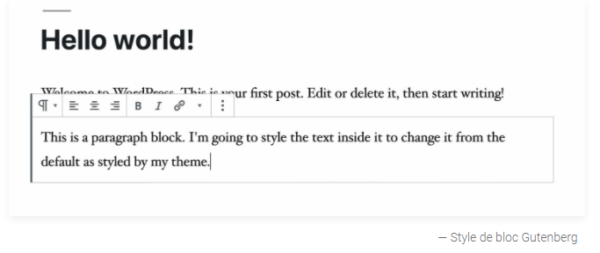
With the Gutenberg block editor, you can modify the style of the text in your post or on your page. To do so, select the part you wish to modify.
Source : kinsta.com
A small menu will appear, click on the icons to modify your text. You can make the text bold, italic, underlined, etc.
2.1.2. The classic editor
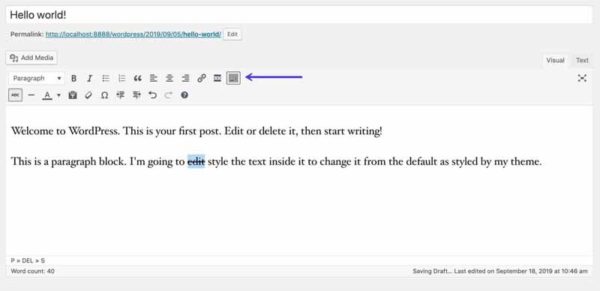
The classic editor is present in older versions of WordPress and includes a toolbar where you can easily edit your texts.
Source : kinsta.com
2.1.3. The WordPress Customization Tool
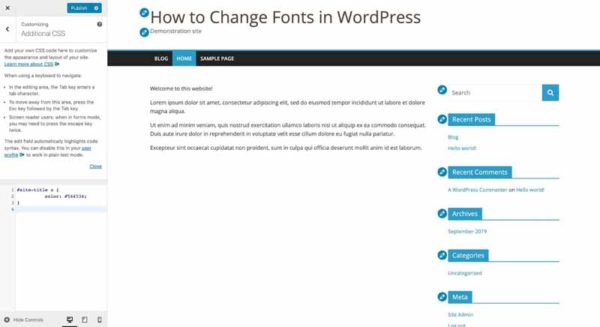
In the customization tool, you can modify text by adding manual CSS. To do this, go to the customization tab and click on “Add additional CSS”.
Then fill in the dialog box with the CSS you want to add.
2.1.4. Making changes in the style sheet
For this scenario, if you’re using a default WordPress theme, you’ll need to create a child theme.
In this child theme, you’ll need to set up a new stylesheet where you’ll integrate your new font style.
If you’re using a custom theme, open your theme folder wp-content/themes and edit the CSS in the style.css file.
2.2 How do I change font colors on WordPress?
You can also change the color of some of the text on your site using the same methods as for changing the font style.
2.2.1. Gutenberg editor
The Gutenberg block editor lets you not only change the color of text, but also its background. To do this, you need to :
- Open the frame;
- Access the “Color settings” tab;
- Then select the color palettes you like to modify the color of your text blocks and their backgrounds.
2.2.2. The classic WordPress editor
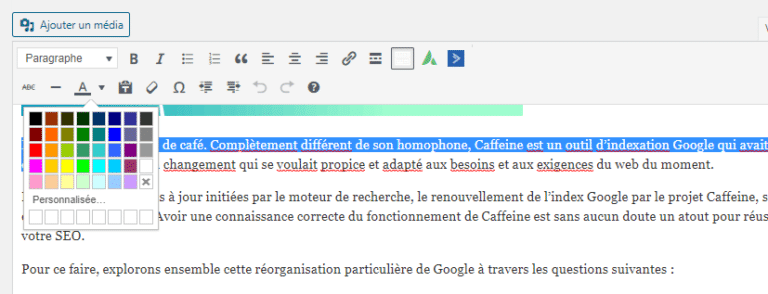
The classic editor of older versions of WordPress also lets you change only the color of the text you’ve selected.
2.2.3. Theme customization
Some themes allow you to change the colors of your site. But you must first add CSS to the customization tool before you can change the colors.
Click on the “Add additional CSS” tab in the customization section and enter your CSS in the text box.
Source : kinsta.com
2.2.4. The style sheet
The style sheet also lets you change font colors. But to use it, make sure you create a child theme and a new stylesheet if your theme is a default theme.
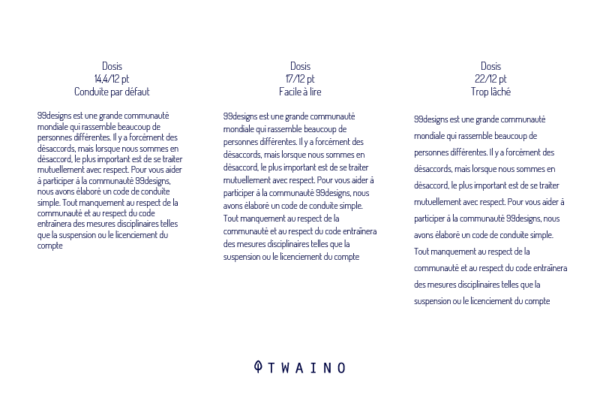
As for font size, you can also modify it using these different methods. Take care, however, because if your paragraphs differ too much in size, they will look inconsistent and difficult to read.
For colors, if the combination makes access difficult, you’ll receive a warning from WordPress. Also note that if the colors are too much, your site won’t look truly professional, which will certainly disappoint your visitors.
Speaking of “pleasing your visitors”, in the next chapter I’ll show you how to choose the right fonts to integrate into your WordPress site.
Chapter 3. Best practices for finding the right fonts
It’s good to customize your fonts. But it’s even better to choose and apply the right fonts.
As I said earlier, fonts are the showcase of your theme. In one way or another, they reflect the image of your website.
3.1. Things to consider when choosing your fonts
The first thing is to choose fonts according to the image you want to give your site or brand. You should also focus on :
- Legibility: If the font is poorly visible or illegible, your site’s interface will look unpleasant, and visitors will also tire of reading you because of the wrong choice of font.
- Font size: Choose a font with a good size to make your blog more pleasant to navigate.
- Line spacing and spacing between characters: It’s common knowledge that the internet stream is now owned by smartphones. Imagine reading a blog post with characters that are hard to make out on your smartphone.

It’s also important to get the font mix right. You can opt for fonts from the same family, or pick and choose those that interest you.
So make sure you get the right combination so as not to weigh down your theme or mess up your customization. There are also several online tools like Fontjoy or Fontpair to help you create the perfect combination.
3.2. Tips for choosing
It’s not easy to make the right choice that will please you, your visitors and make your WordPress “beautiful”.
Here are a few tips to help you choose the right font:
- Look for fonts on your printed documents that are interesting enough to be used as web fonts.
- Choose the most popular fonts from font banks. They’re used by a large number of people, so they’re familiar to web users.
- Visit your competitors’ sites and see what they have to offer, so you can respond better.
Take the trouble to experiment with your choices before applying them to your site. Avoid queuing font variations you don’t use, or hosting fonts you don’t use on your site.
Also make sure that the fonts you use are properly queued.
Chapter 4: Other questions about WordPress fonts
4.1. How do I integrate a custom font into WordPress?
There are a number of options available to you:
- Encode web fonts in your theme and use them;
- Install an extension on your site that allows you to use web fonts;
- Manually add downloaded fonts from a local source;
- Host fonts on your WordPress site.
4.2 How do I download fonts via the WordPress file manager?
To download your font using the File Manager, proceed as follows:
- Go to your cPanel website;
- Go to File Manager;
- Go to wp-content/themes/your-theme/fonts (or create a font folder if none exists);
- Download the custom font zip file;
- Unzip the font into the folder ;
- Make a note of the file path, as you’ll need to reference it in your CSS.
4.3. How do you add your custom font to your theme?
This requires you to reference it in your styles.css document and specify where you want it applied.
If you haven’t already done so, make sure you’re using a child theme so that your custom CSS isn’t lost during theme updates. We talked about this in Chapter 2.
You can add custom CSS to your website to reference your new font. To do this, you have two options:
- Use the WordPress editor;
- Use the file manager.
4.4. What fonts can be used on the Web?
Technically speaking, you can add just about any font to any website.
However, when looking for a font online, you should always bear in mind the price, license agreement and installation method.
Without further ado, here are some of the most popular font libraries that can help you find the perfect font:
- Google Fonts (FREE);
- Adobe Fonts (Premium) Adobe Fonts (formerly Typekit) ;
- Font Squirrel.
4.5. What font formats are there?
Now it’s time to learn about the different types of fonts available. It’s important to remember that each font type has a different extension and compatibility with a different range of browsers.
- TrueType font (TTF) ;
- OpenType font (OTF) ;
- Web Open Font Format (WOFF) ;
- Web Open Font Format 2.0 (WOFF2) ;
- Embedded OpenType font (EOT).
4.6. How are font formats supported by browsers?
In recent years, modern browsers have considerably improved the way they support custom fonts. But even today, not all formats are supported on all browsers.
Here are the most popular browsers and the font format they currently support:
- TrueType font (TTF): Compatible with Internet Explorer version 9.0 and higher, Chrome from 4.0, Firefox from 3.5, Safari from 3.1 and Opera from 10.0 ;
- OpenType font (OTF): Has the same browser compatibility as the TrueType font;
- Web Open Font Format (WOFF) : Works with Internet Explorer version 9.0 and above, Chrome 5.0 , Firefox 3.6 , Safari 5.1 and Opera from 11.1 ;
- Web Open Font Format 2.0 (WOFF2) : Works with Google Chrome since version 36.0, Firefox since 35.0 and Opera since 26.0 ;
- Embedded OpenType font (EOT): Works only with Internet Explorer version 6.

Source : w3schools
4.7. How to choose the right font format?
Web Open Font Format (WOFF) has become the industry standard font type, as it contains additional metadata and uses less bandwidth for rendering.
However, it is often difficult to find WOFF versions of all fonts, and it is a font type used on modern browsers.
TTF and OTF fonts, on the other hand, are easier to find and may be available if you can’t find a WOFF version of your chosen font.
In short, using TTF/OTF and WOFF will ensure that your fonts are supported by all browsers.
For more details on supported font formats, try Can I Use, an excellent tool for researching feature compatibility between different browser versions (FREE).
In a nutshell
Font customization is an important asset if you want to set your WordPress site apart from the rest.
Although it’s not an easy exercise, it helps to beautify your site’s theme or design and optimize the user experience.
The choice of fonts is just as important as their format. So make sure you select the right fonts for your brand image, and modify them as you see fit.
You should also include web-safe fonts or emergency fonts in case visitors, for one reason or another, can’t see the fonts you’ve integrated.
However, don’t overdo the modifications. You risk making your site difficult to access and your texts weary and hard to read.
So now you know how to integrate and modify fonts on your WordPress site, how to modify text colors and also how to choose the right fonts to make your site attractive and professional.
Thank you and see you soon!


Thanks for sharing the wonderful and exciting way to add custom fonts to the WordPress site quickly. It is very informative, and you describe it very well.
This tutorial is very beneficial for all developers in that you explain step by step.
Thank you very much Kate, it is very nice 🙂