
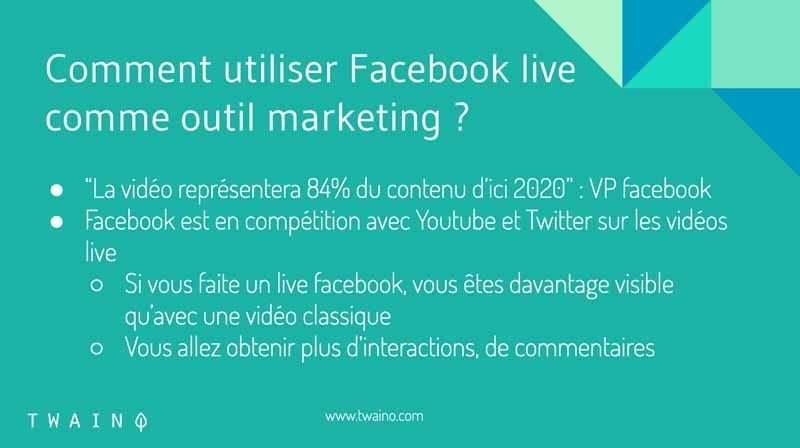
With 7.6 billion people on Earth, Facebook alone has more than 2 billion monthly active users. In other words, 2 out of 7 people worldwide use Facebook on a monthly basis. There is no doubt that it is one of the most important platforms if you want to get visibility and increase the reach of your business. Moreover, the most popular social network is constantly improving its services by developing powerful tools for digital marketing. One of these tools is Facebook Live which allows users of the social network to broadcast live events, conferences, shows. Knowing that 93.7% of companies use Facebooklive, but that only 42.7% of them used Facebook Live in 2018, this is a real opportunity to do better than your competitors. Especially since this content format is getting a lot of attention from Facebook users as the daily time spent watching Facebook Live broadcasts has multiplied by 4 with more than 2 billion views. It is obvious that this is a real marketing tool that you can use in your strategies and I will explain how to explore it and the tips for maximum success with your Facebook Live videos.
Facebook Live
Find out in this video what are the best methods to learn online marketing today:
So for this, I made a quick presentation, so on powerpoint in order to present you the different elements I found:
What is Facebook Live?
Facebook Live is a feature that uses the camera and microphone of a computer or mobile device to broadcast videos in real time on Facebook. In addition, Facebook Live offers the ability to broadcast videos with both a page and a personal account.
Broadcasters have the ability to decide who can see their video and use this type of content to drive more engagement with their audience. Also, when a Facebook Live video is created, it can be posted at the end of the broadcast so that those who missed the live broadcast can view it.

Indeed, Facebook Live was launched in April 2016, and while some marketers are still hesitant to use it, those who are already using it seem to be performing very well.
Why should you use Facebook Live?
In 2016, Facebook made an update to its algorithm, one of the goals of which was to improve the visibility of live videos. The social network itself states, ” Now that more and more people are watching live videos, we’re looking at live videos as a new type of content – different from normal videos – and learning how to rank them in News Feed. As a first step, we’re making a small update to News Feed so that Facebook Live videos are more likely to appear higher in News Feed when they’re actually live than after they’re no longer live.”

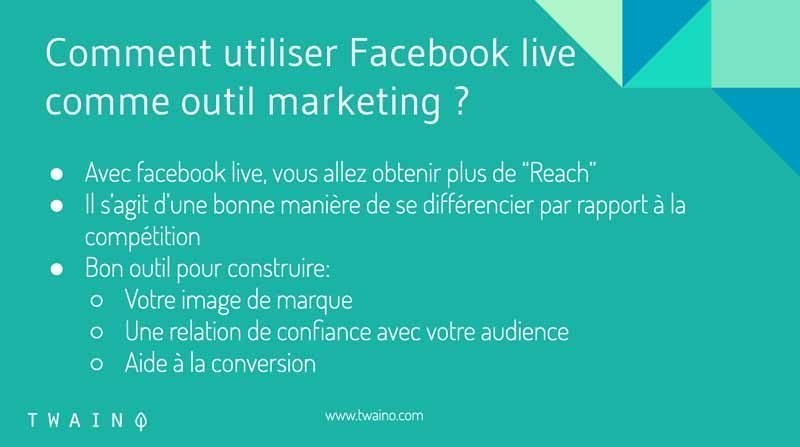
In short, Facebook Live videos will be favored and if you have any knowledge of SEOyou know what it’s all about: If you want to get visibility on Facebook, you need to consider including Facebook Live in your marketing strategies.
According to 99firmsfacebook Live videos generate 6 times more interactions and 10 times more comments than traditional videos. At the same time, its popularity has increased by 330% in just one year. This makes Facebook Live a tool you should use if you are trying to:
- Increase your brand awareness;
- Get more leads;
- Increase interactions with your current customers;
- Etc..
For your marketing campaigns, I show you the six ways you can use Facebook Live.
1. Communicate with your audience in the most authentic and human way possible
Who would you choose between a salesperson who does a live video where you can interact with them and one who did a regular video? You’re likely to choose the first salesperson, since interactions do allow you to judge the relevance of information and make a quick decision.
Well, there is no better way to communicate with your subscribers and potential customers than through live video. Essentially, it’s just like meeting your customers in person, since the event is happening in real time, meaning with eye contact.
Therefore, Facebook Live gives you the opportunity to show that there are real humans behind your business, which is sure to build trust with your audience and thus improve sales.
2. Answer questions in real time
Facebook Live allows you to answer questions from your followers in real time. This is a real asset as it gives you the opportunity to engage with viewers when they are most interested.
The best strategy to do this effectively is to create a regular series of Facebook Live videos. However, you need to have a set date and time to be live to create some sort of appointment with your audience.
If you’re a business, consider highlighting hosts who aren’t afraid to show their personality, and make sure you have someone ready to monitor questions so you can answer them in real time.
3. Share trends and news about your industry
Keeping your audience informed about trends in your industry without being too sales-focused is a much more natural way to attract trusted followers on Facebook. In fact, people will start to look to you as a true source of information that keeps them up to date on news related to your industry. You’re going to tap into that 25% of users who watch live videos to stay informed.
As an example, you have the social media management tool, Hootsuite, which has launched a series called #HootLive where they live stream news on social media. Hootsuite shows their audience that they care about keeping informed as well as sharing their knowledge, while being able to engage and answer their questions in real time.
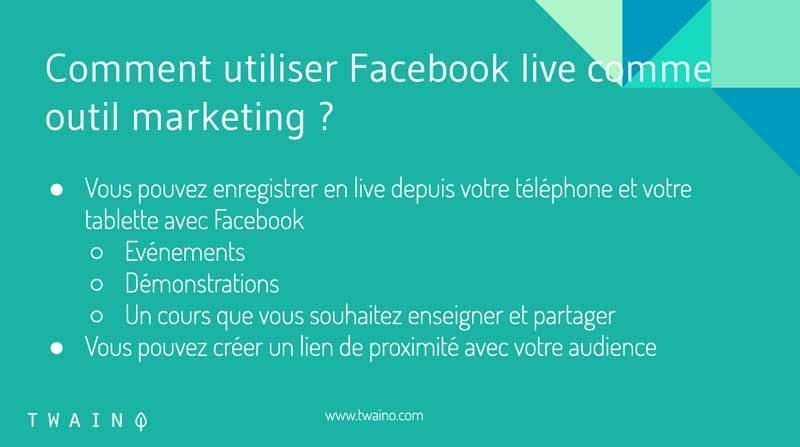
4. Present an event to people who can’t physically attend
Facebook Live is also a great way to broadcast events with customers or prospects who couldn’t make the trip to attend. As long as you are allowed to live stream an event or conference your company is hosting, don’t hesitate to do so.
This will ensure that those who were unable to attend in person can still benefit from the valuable information given during the event.
5. Show your company culture
With Facebook Live, you also have the opportunity to showcase your company’s unique personalities and values. You can:
- Stroll through the office and show off your space;
- Interview employees;
- Show a company event like an anniversary;
- Make a video of how video shoots are done;
- Etc..


Sharing your culture with your audience has many long-term benefits and you can make it a powerful marketing tool. Be careful, showing your culture is one thing, but make sure it is really relevant to your business. Otherwise, you risk losing subscribers and therefore potential customers.
6. Create more excitement around product releases
Facebook Live is one of the best ways to create intrigue around your product launches. In fact, live videos are raw and often unedited, which means that as a viewer, you don’t know what to expect.
Brands can use that same emotion to build excitement around a new product or service. And if you promote your live video properly, customers will come back to see updates or get more information about the release.
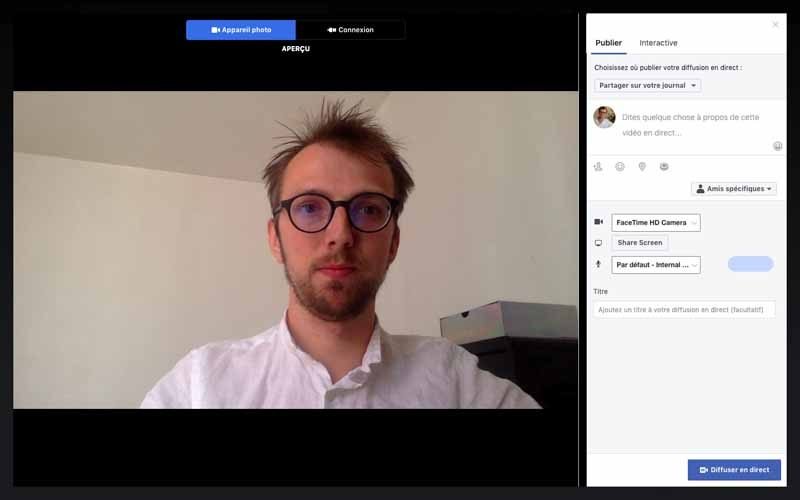
How do I do a live broadcast on Facebook Live?
In its early days, Facebook Live started as a mobile-only broadcasting feature. Currently, Facebook pages can broadcast from mobile devices or desktop computers.
Now that you have enough reasons to use Facebook Live, let’s look at how you can use it. The good news is that it’s very simple to create your first Live video. All you need is a mobile device or a desktop computer with a microphone and a camera or webcam.
We will see how to broadcast from mobile devices, then how to do it with a computer since the processes are different even if the principle remains the same.
The 11 steps to use Facebook Live on mobile
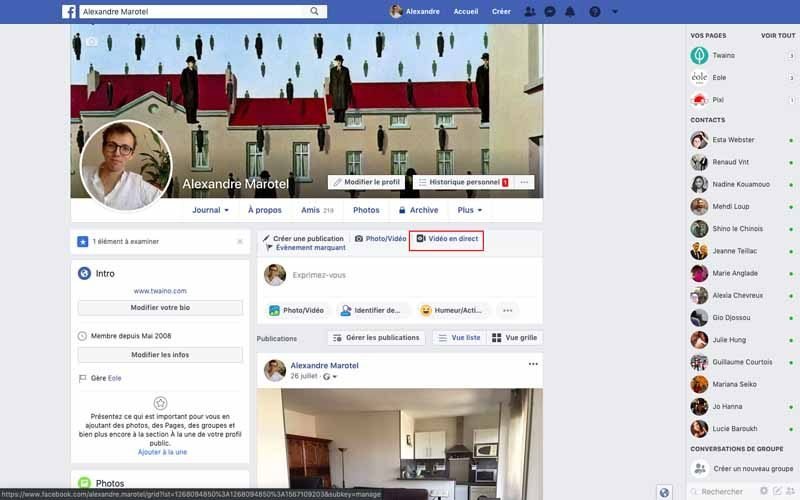
Step 1: Select the live video icon
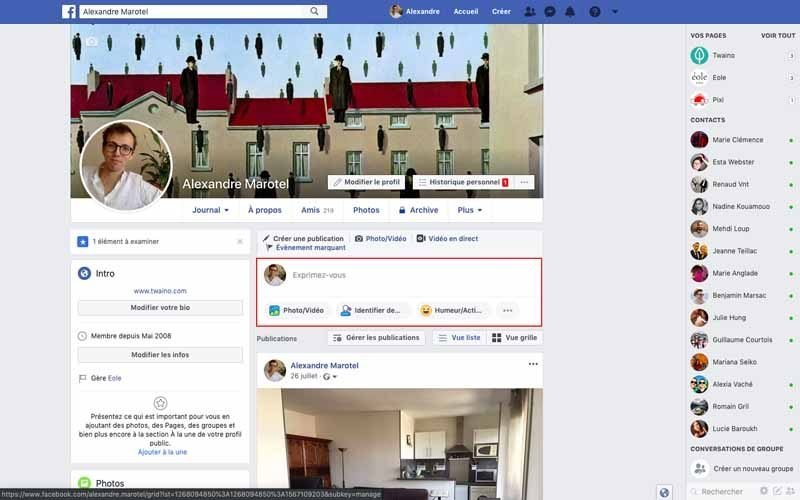
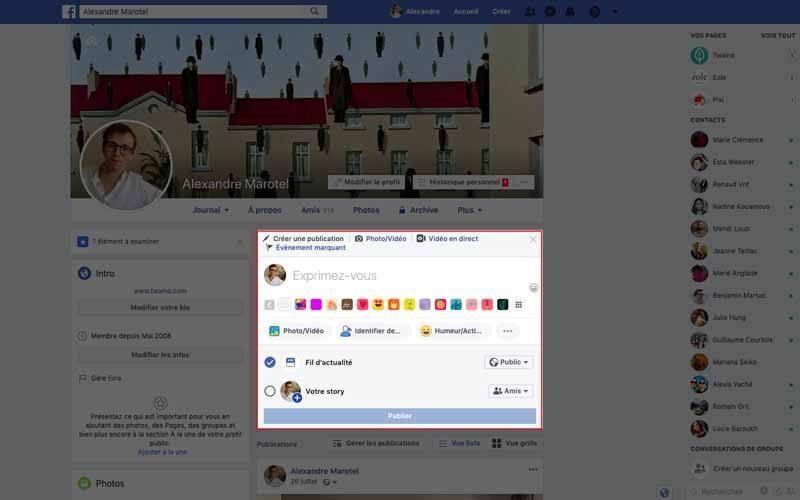
Open your Facebook mobile app and go to your News Feed. Do as if you want to write a classic post, you will have the “Live Video” button that you will press.

(image)
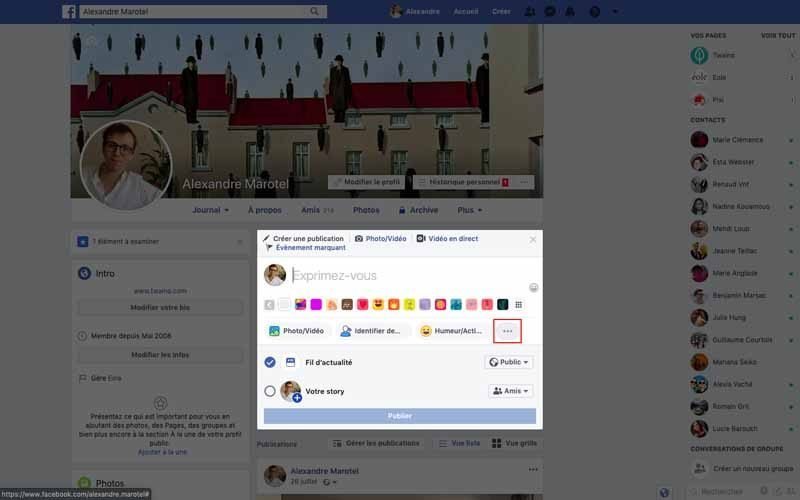
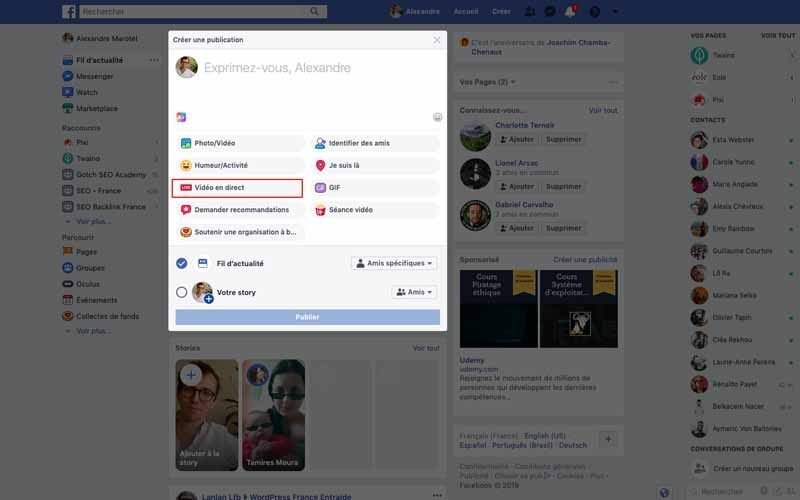
To keep it simple, you can click on the “Express Yourself” text which will give you access to different options.
(image)
In case you manage your page in the Business Manager, the Live is done through the Page Manager. Within the application, click on “Publish” which is located in the upper left corner and just below the profile picture.
(image)
Next, you have the editing window that gives you access to the “Live Video” button.
(image)
Step 2: Allow access to your microphone and camera
If you have never recorded video with Facebook, the application will ask you for permission to access your camera and microphone.
Of course, you will accept it this time and rest assured, you won’t have to do it again next time with the same device.
Once you authorize the use of your camera, Facebook will ask you to authorize the use of your camera content. This will allow you to switch from your rear-facing camera to your front-facing camera.
Step 3: Switch to “Live” at the bottom of your camera screen
Facebook now has access to your camera, but the live stream doesn’t start automatically.

To go Live, look at the bottom of your screen, you have the different types of visual content you can create.

On the far left, as shown in the image, you will see the “LIVE” setting that you will select. Don’t worry, the live broadcast doesn’t start yet.
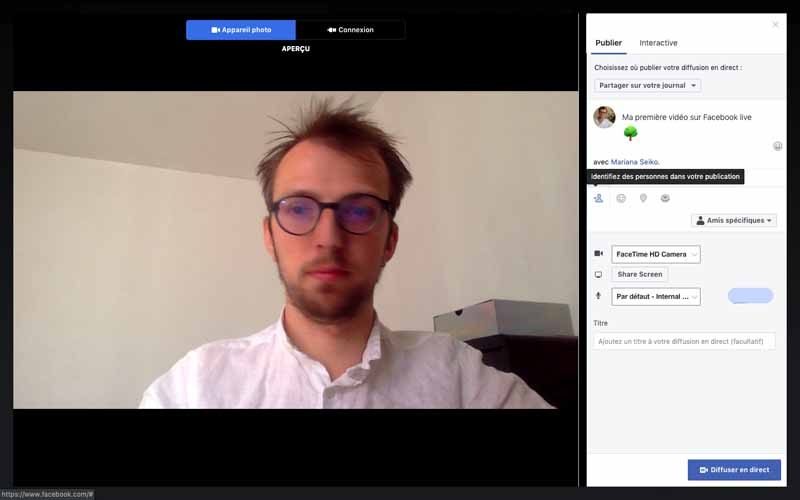
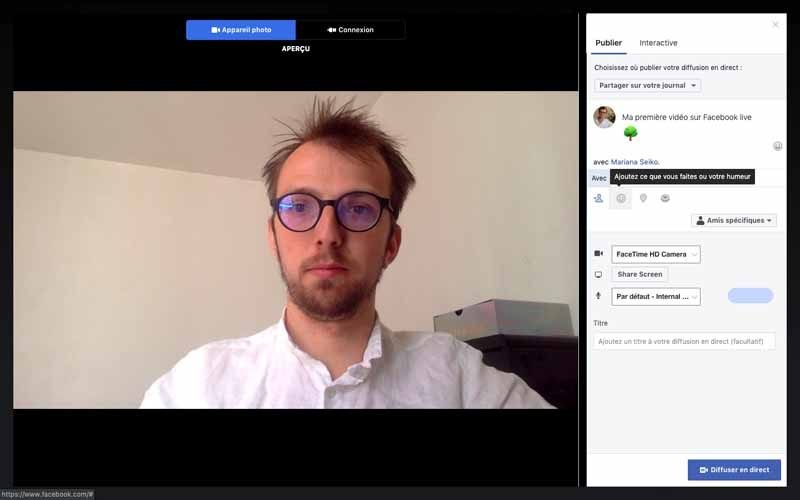
Adding information before starting the live broadcast:

Share an activity:

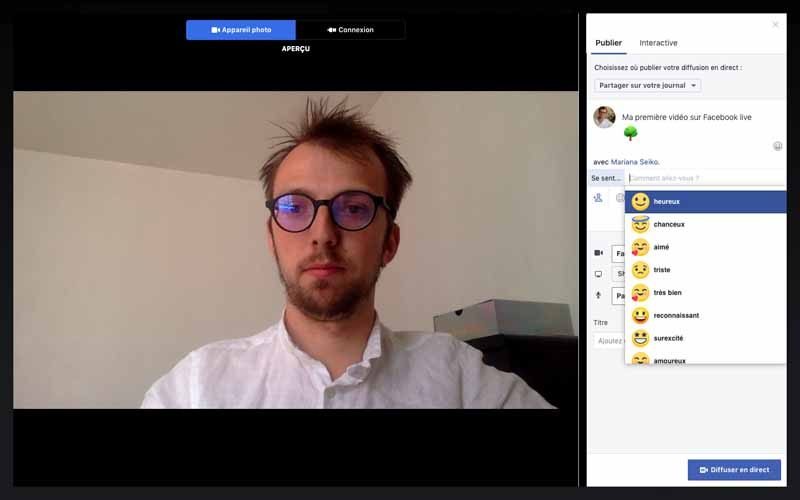
Share your mood:

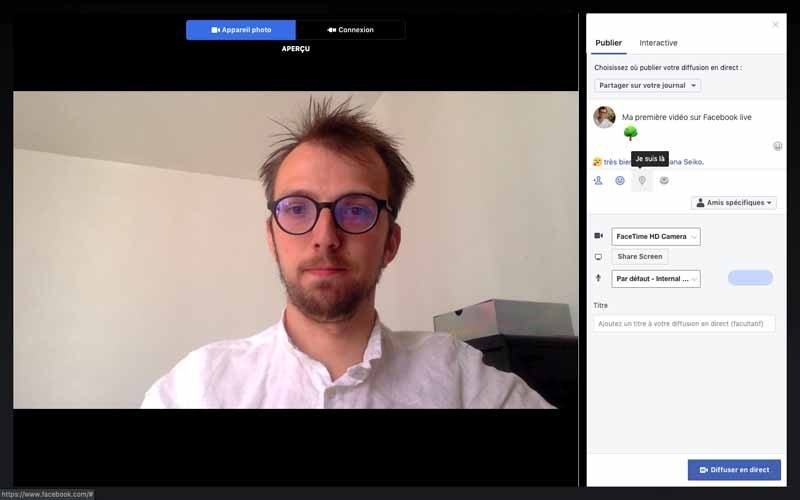
Add location:

Add description:

Add a button to make a donation

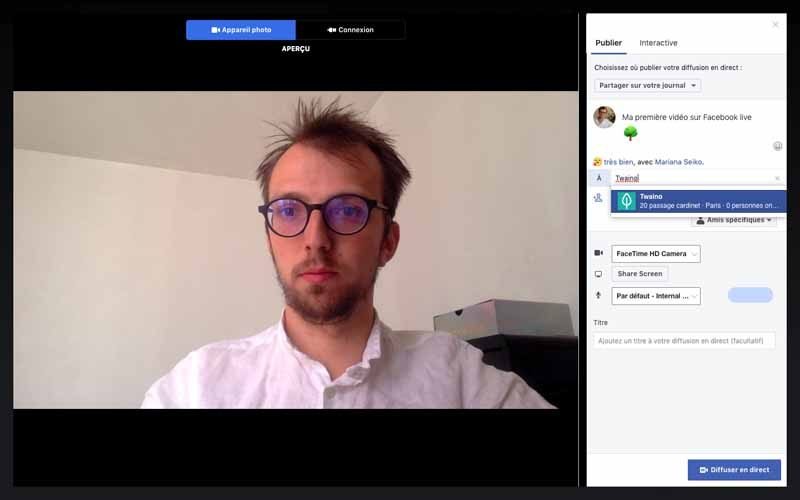
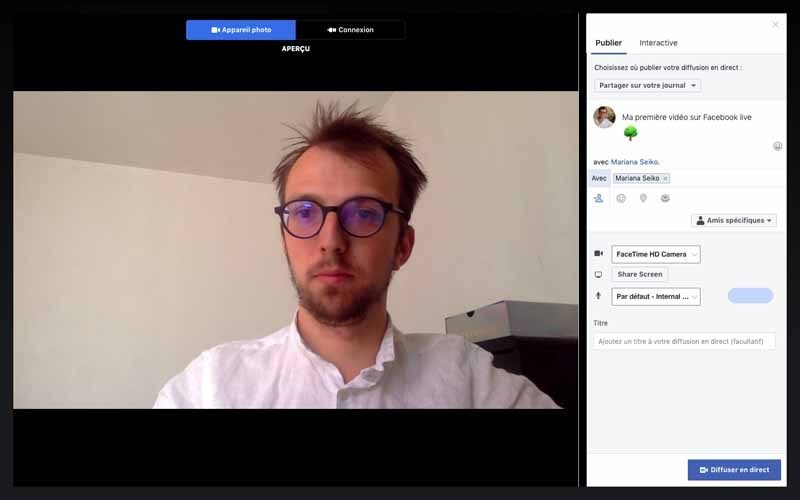
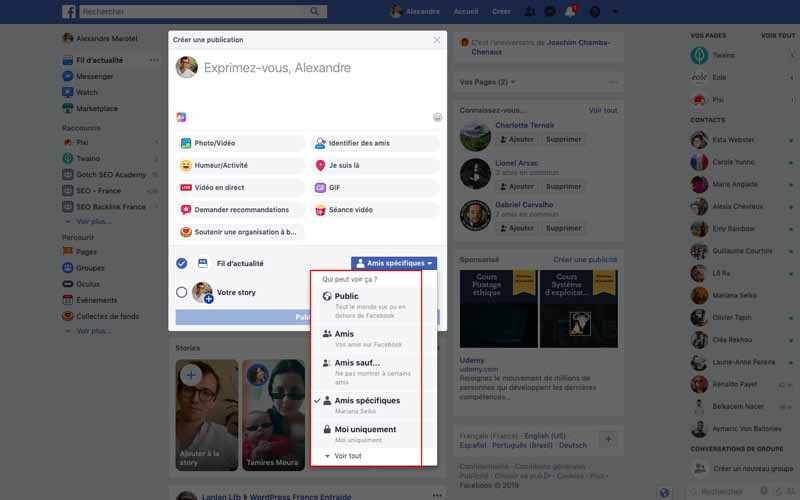
Step 4: Choose your privacy and display settings
Facebook allows you to choose who can see your live video. Live videos behave exactly like a Facebook post, you can make them private, public or visible only to your friends.
Select the live settings:

Select Public privacy to broadcast to everyone:

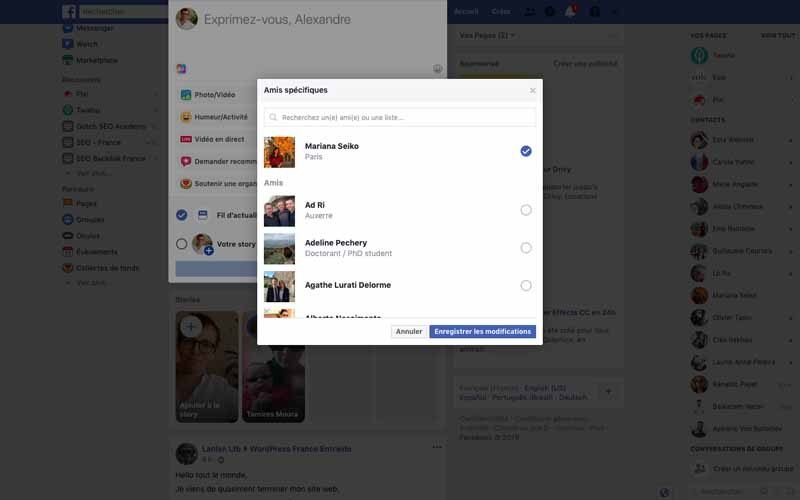
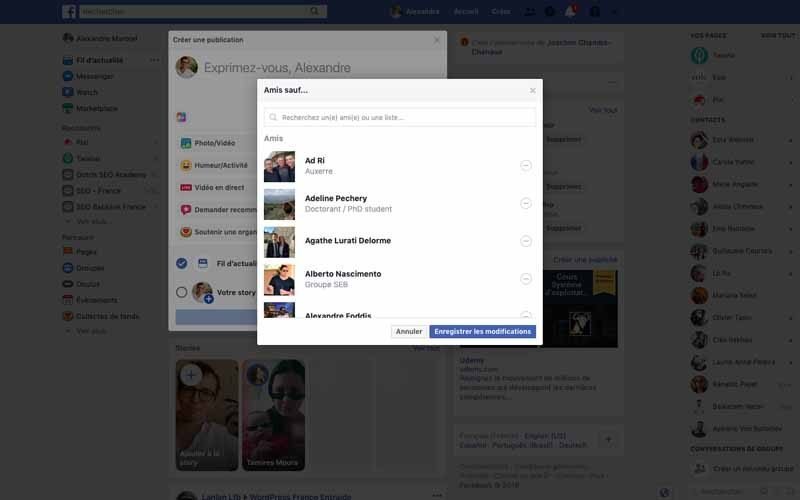
Select privacy for specific Facebook friends:

Select privacy Friends except :

Select privacy Specific friends:

Broadcast to me only:

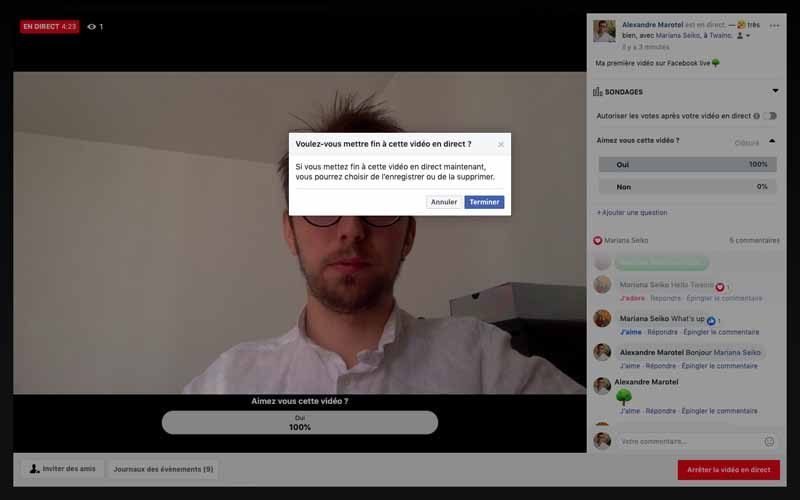
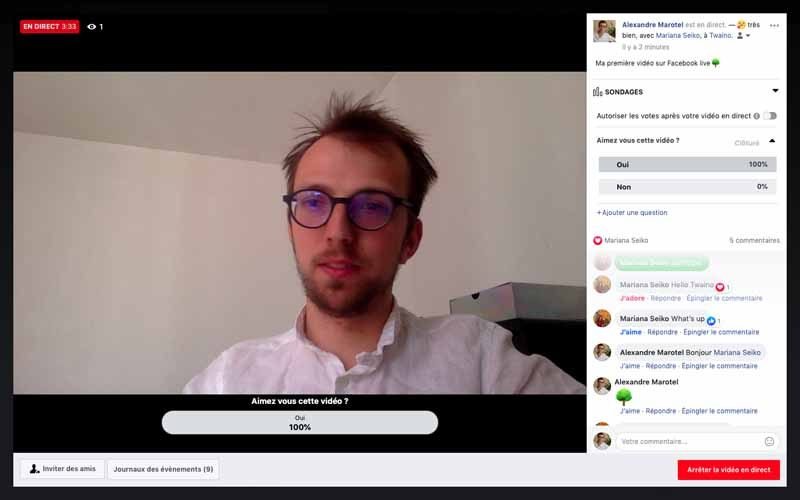
In the screenshot below, you can see in the top left that Live is set to “Only me” and “Post, Story”. This means that only I can see the live video and no one else can. You can change these settings by simply tapping on them.
Identify people:

Specific friends:

All friends except:

Identify people:

If your Live is for a brand, you will probably make it public so that it can reach everyone in your audience on Facebook. But, if you’re doing the Live on your personal profile, you may want to reserve your broadcast for your friends only.
However, if this is your first Facebook Live and you want to test it first, or if you want to prepare your shot before going live, choose the “Only Me” privacy setting.
(image)
Step 5: Write a click-worthy description
The description and thumbnail of your video are by far the most important elements to work on. Without a strong title and a description that is compelling enough to entice your audience, you may not get many viewers.
In addition to being direct and informative, your copy needs to pique the curiosity of your readers.
For tips on writing compelling headlines, you can check out my article on this very subject.
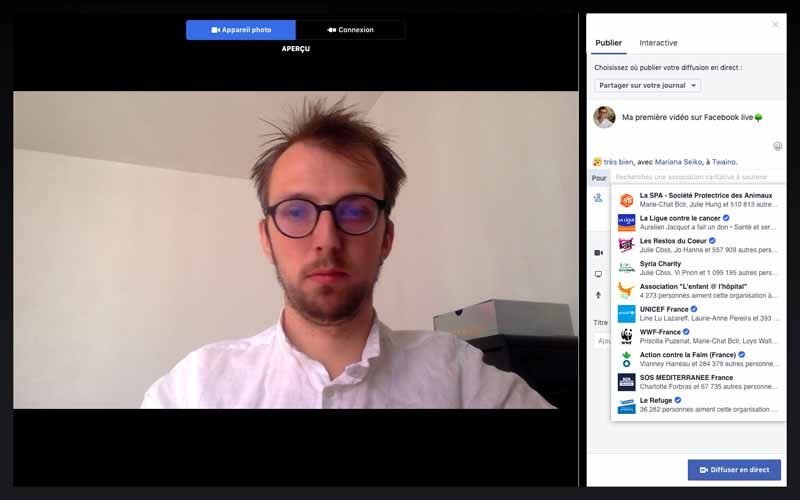
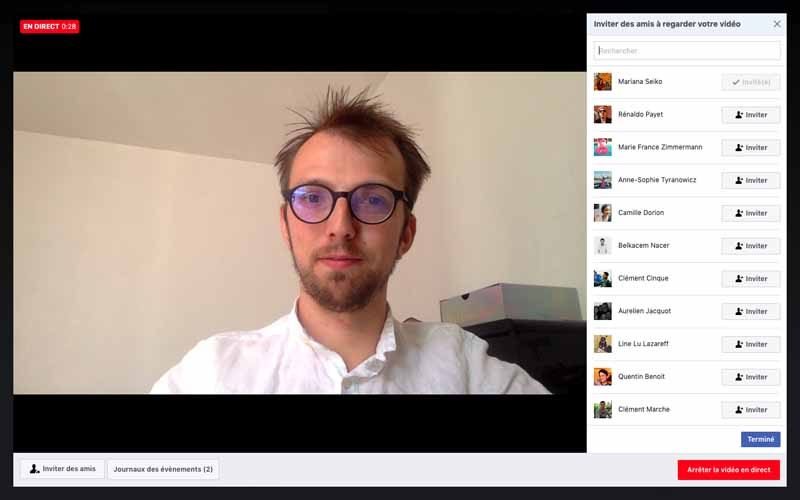
Step 6: Tag Your Friends or Choose Your Location
To personalize your Live, you can tag your friends or people you want, add your location and share what you are doing. By doing this, you’ll make it easier for people to see your video while also making them want to see what you’re broadcasting.
Invite friends to watch the video:

The invitation is sent:

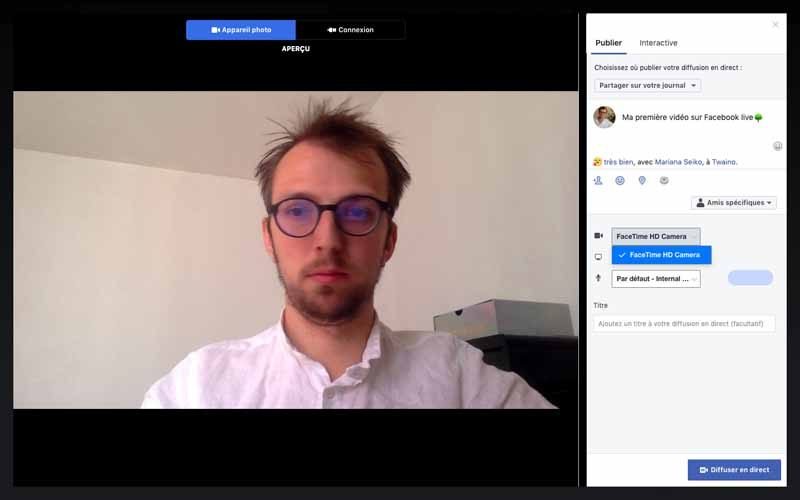
Step 7: Set your camera orientation and add filters
Do you want to go live with your camera lens facing forward or facing backwards? Before you click “Go Live”, make sure your camera is pointing in the desired direction.
If you want to change the camera view to selfie mode or vice versa, just click on the rotating arrows icon.
After orientation, you can customize your video a little more with filters, drawings, texts… To do this, tap the magic wand icon to the left of the blue “Broadcast Live” icon. Then choose whether you want to add objects to your face, change the camera filter, write or draw to make the video more fantastic.
Note that some editing options may be different depending on the version of the app you have.
Step 8: Press the “Broadcast Live” button
When you click the blue “Broadcast Live” button, Facebook will give you a 3-second countdown before you actually go live.
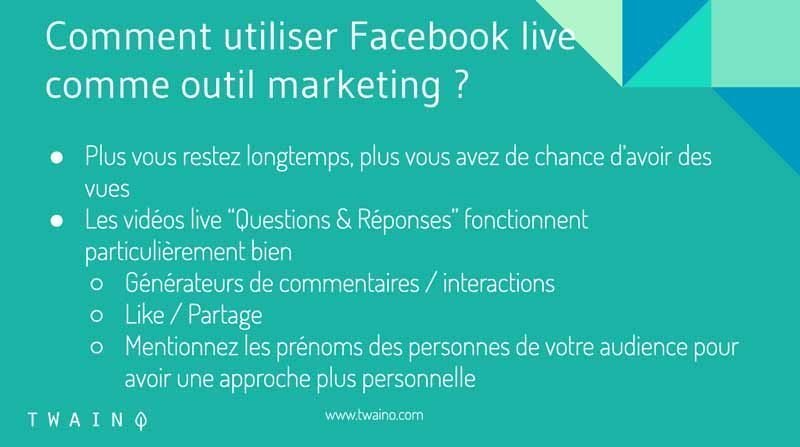
You can record your live stream for up to 90 minutes, and remember that the longer you broadcast, the more likely people scrolling through their Facebook news feeds are to come across your live stream.
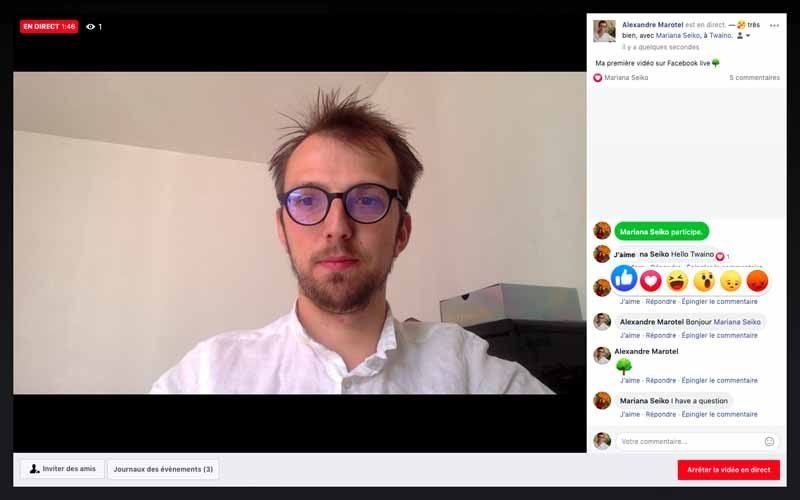
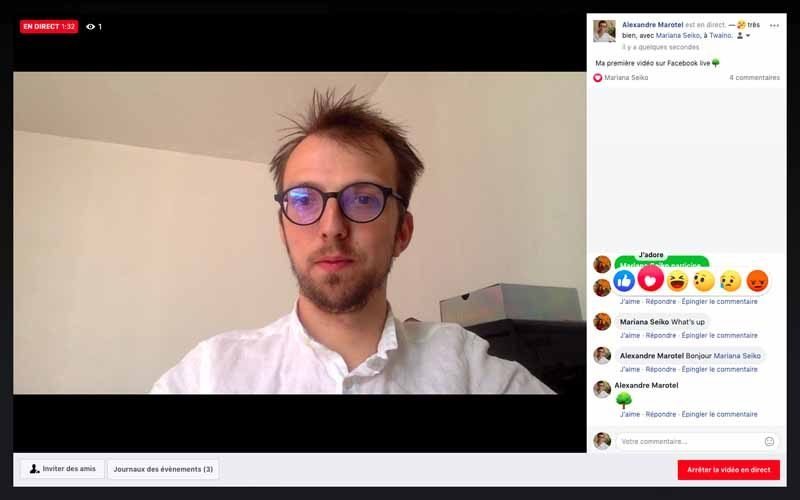
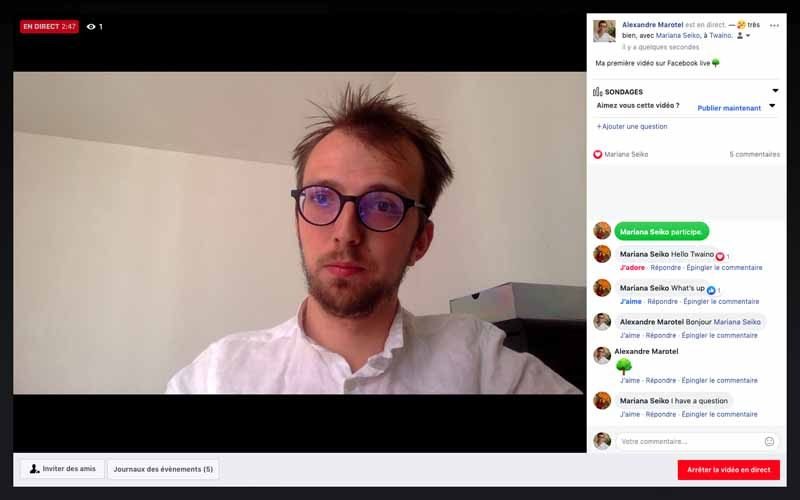
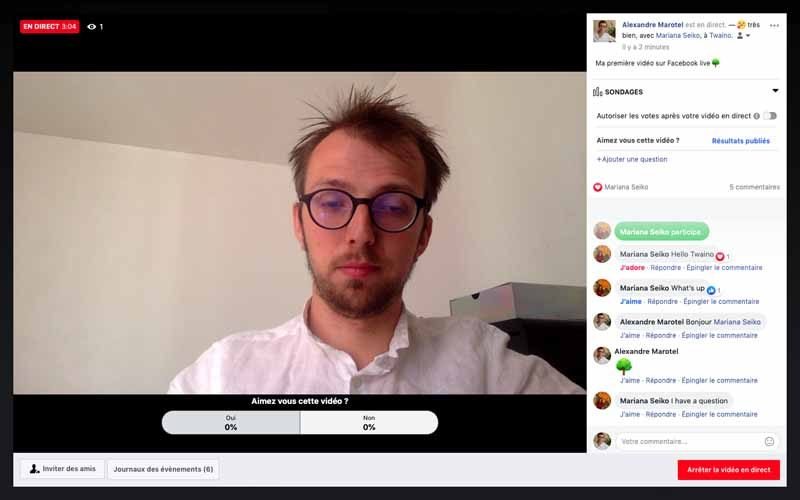
Step 9: Interact with viewers and commentators
Encouraging your audience to interact is one of the best ways to keep them interested. Plus, the more interaction, the higher your live stream’s ranking in others’ news feeds will be.
write comments:

Reply to comments:


Start presentation / discussion:


Receive little hearts:

Interact with comments:


Ask your audience for feedback:

Answer questions:


As you broadcast, you will see the elapsed time at the top left as well as the number of viewers. Comments will appear at the bottom of your stream in reverse chronological order, which means the first comments may be lower.


In addition, you can block viewers during a live broadcast by tapping on the profile picture next to a viewer’s comment and selecting “Block”. In the same way, you can unblock someone you have already blocked.
(image)
Accept guests during your broadcasts, to make the exchange more interactive.


Invite friends to the live chat:

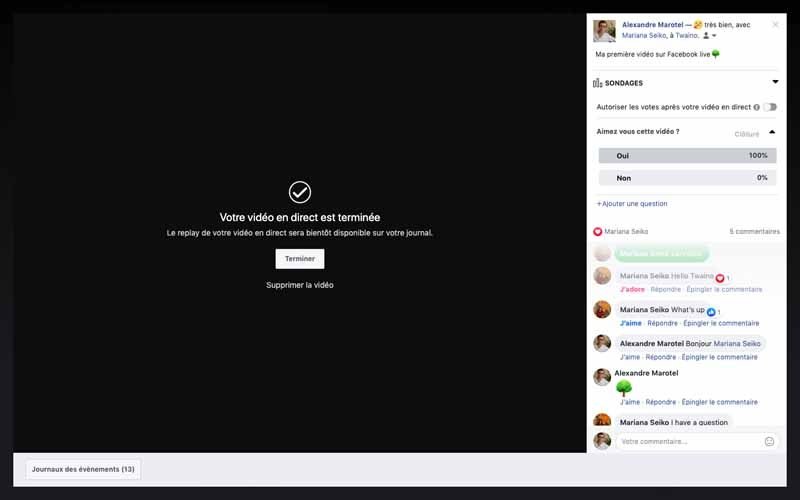
Step 10: Click “Finish” when you’re done
When you are done with your live broadcast, click on the “Finish” button. Make a note of where the “Finish” button is beforehand so you don’t get lost in front of your viewers.

(image)
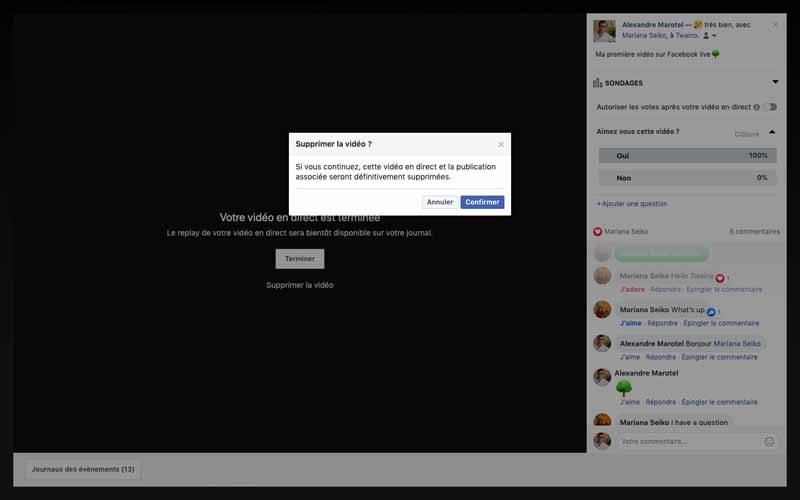
Step 11: Post your video to your page and make any changes you want
Once you’re no longer live, your video can be posted to your page for late-night viewers to enjoy. Share your video on your page and make any edits you need to:
- To the description;
- To the thumbnail;
- To the captions ;
- Etc..


You can also delete the video if you want or change the privacy settings. You have just made your broadcast with your smartphone, now let’s go to the broadcast on a computer.
The 5 steps to use Facebook Live from a computer


Using Facebook Live from a computer is not as spontaneous and “mobile” as it is with a mobile device. If you have a Facebook page for your brand, this is a great and convenient option for filming more static shows. Keep in mind that it’s pretty much the same principle as with a mobile device.
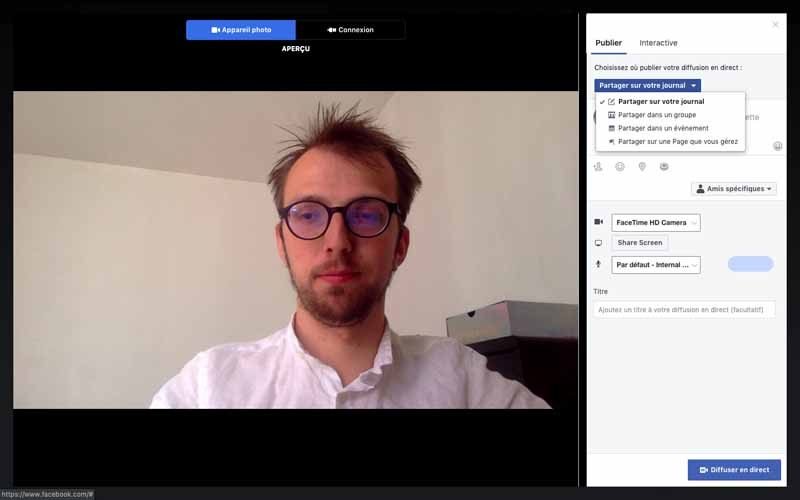
Step 1: Go to your Page and tap on the “Speak Up” box
Also, pretend you want to write a new post and select the “View All” menu option.


Then click on the “Live” icon.
(image)
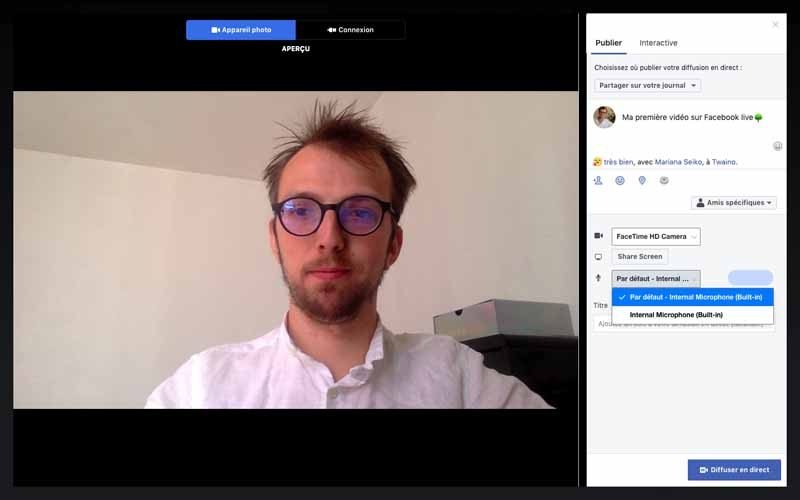
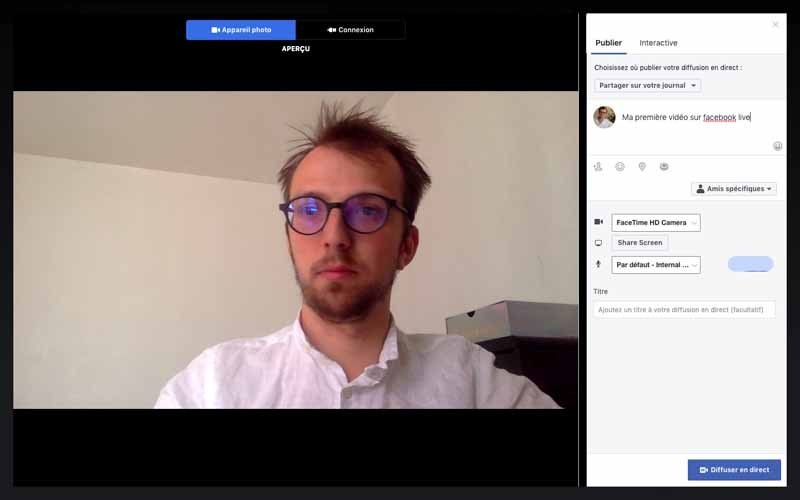
Step 2: Write a compelling description and allow Facebook to use the camera
Your video description will appear on your Page timeline and in your News Feed. To do this, make it compelling enough to draw viewers in to follow your Facebook Live video.
(image)
As with the mobile device, allow Facebook to use your camera and microphone, especially if it’s your first time.
(image)
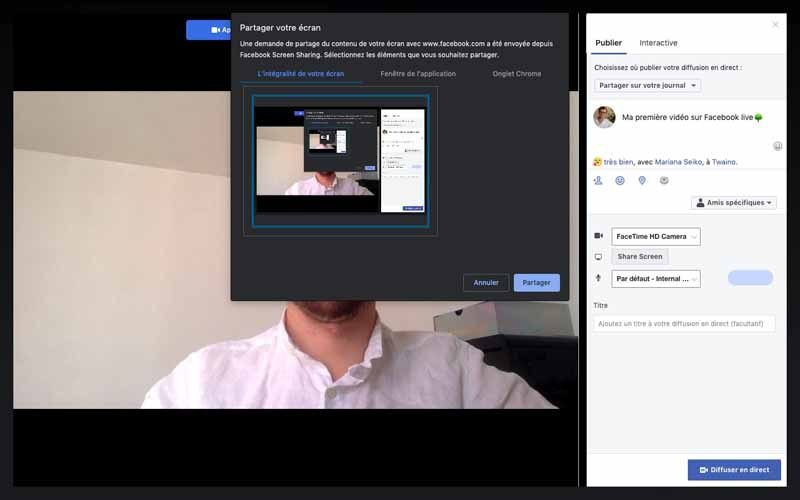
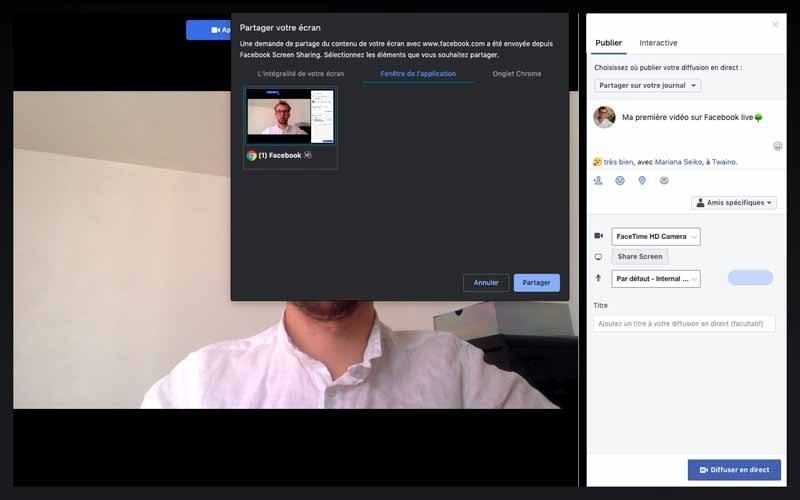
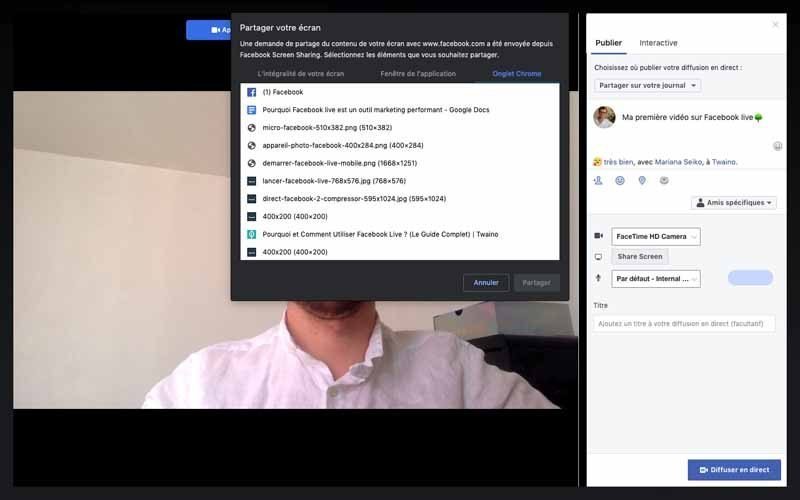
Step 3: Do the final checks
Make sure your hardware is properly configured before you start broadcasting.
(image)
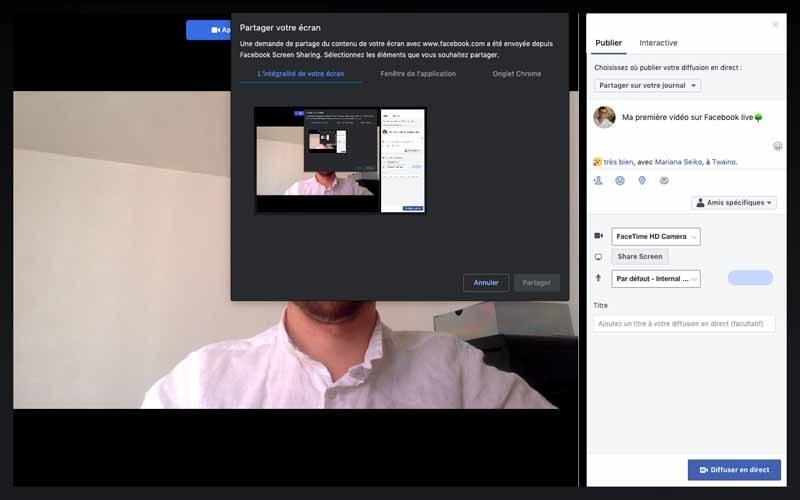
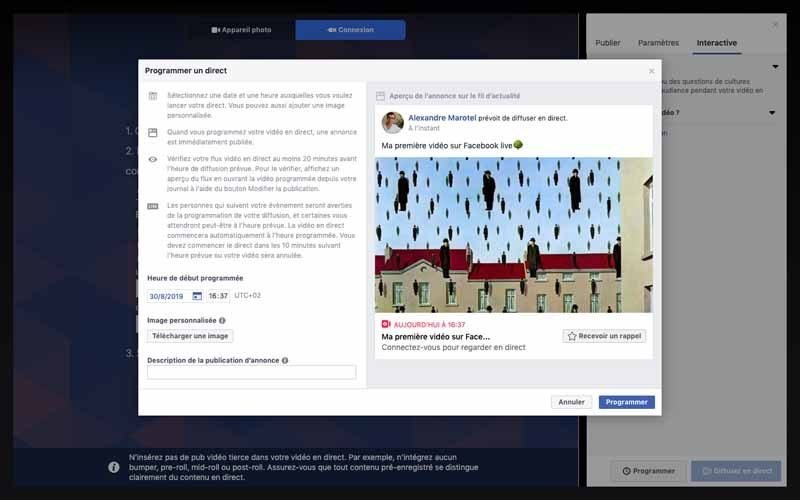
You also have the option to share live video from another external recording device. If you wish to do so, press “click here” to establish the connection.
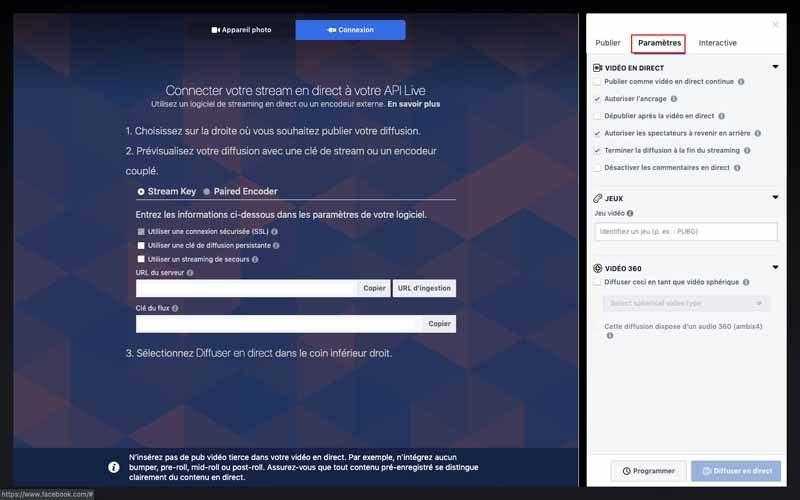
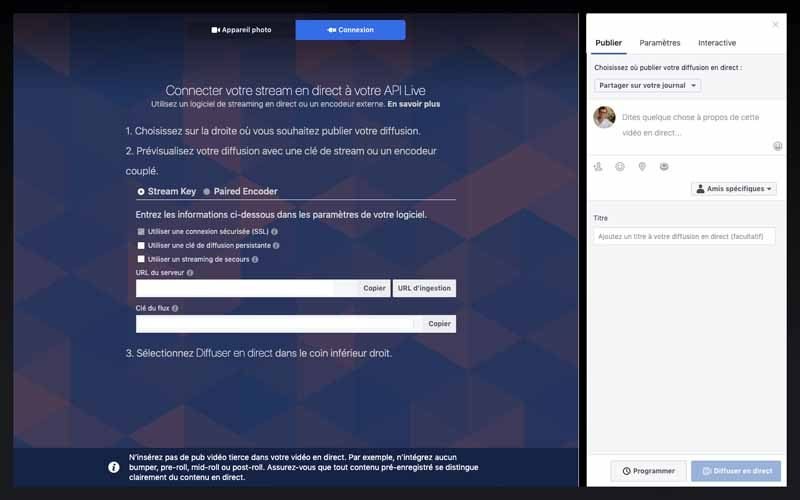
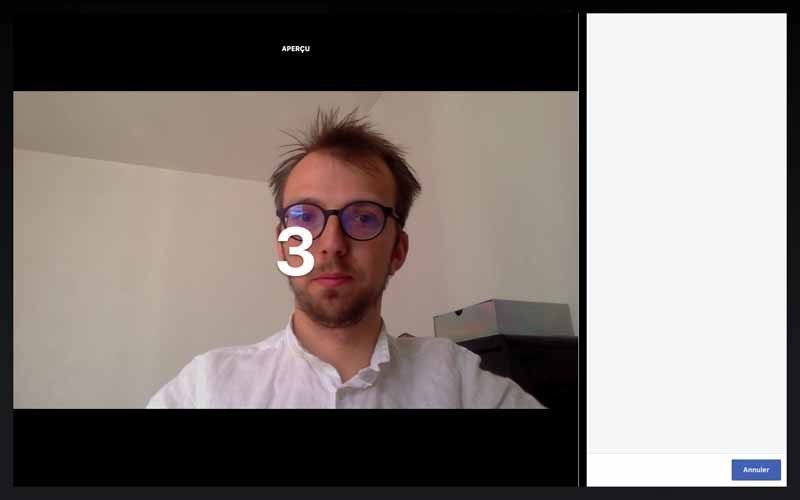
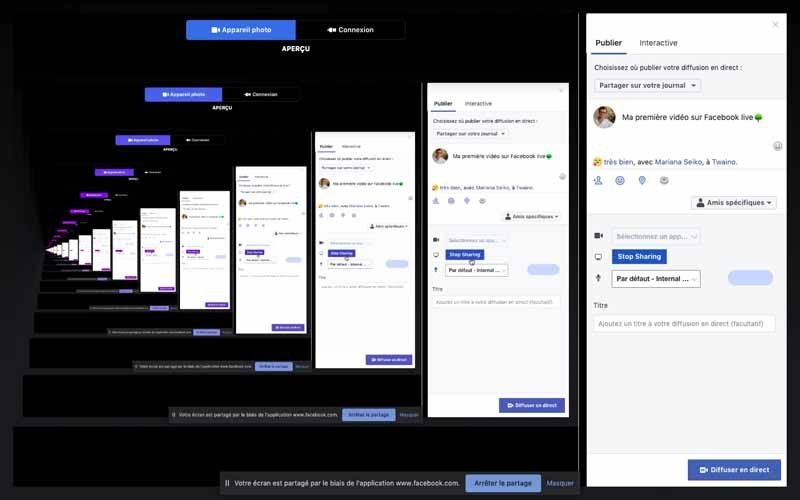
Step 4: Press “Broadcast Live” to start your broadcast
You have a 3 second countdown before you are actually online and if you finish, click “Stop Live Video”.
(image1)
(image2)
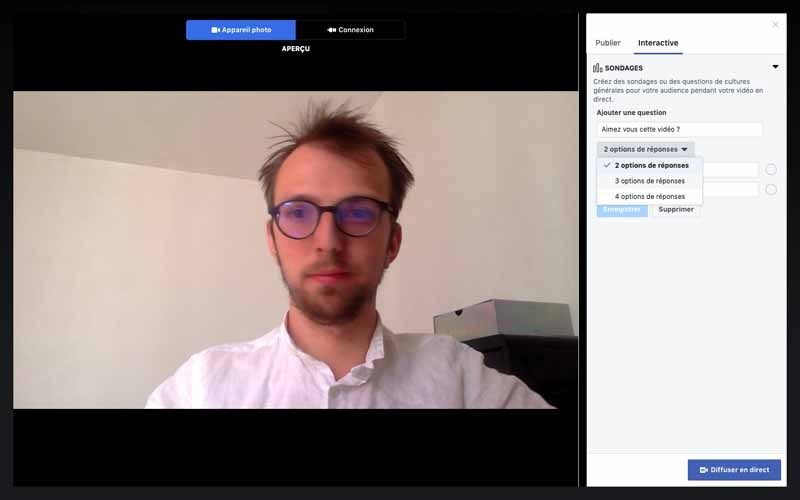
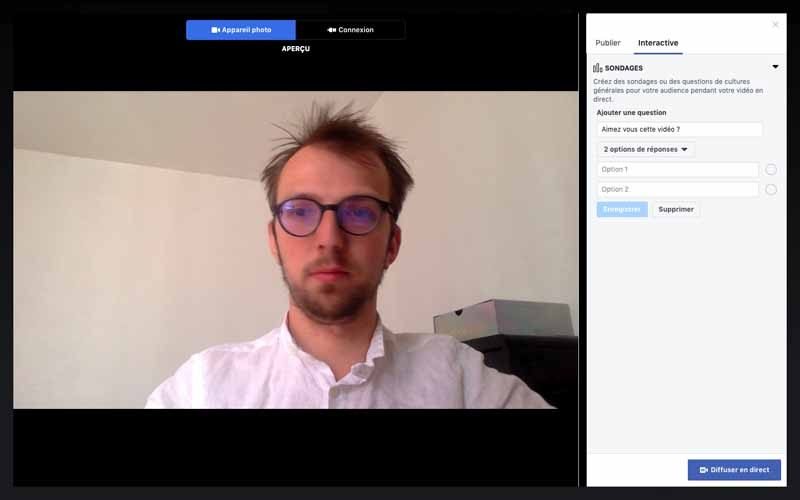
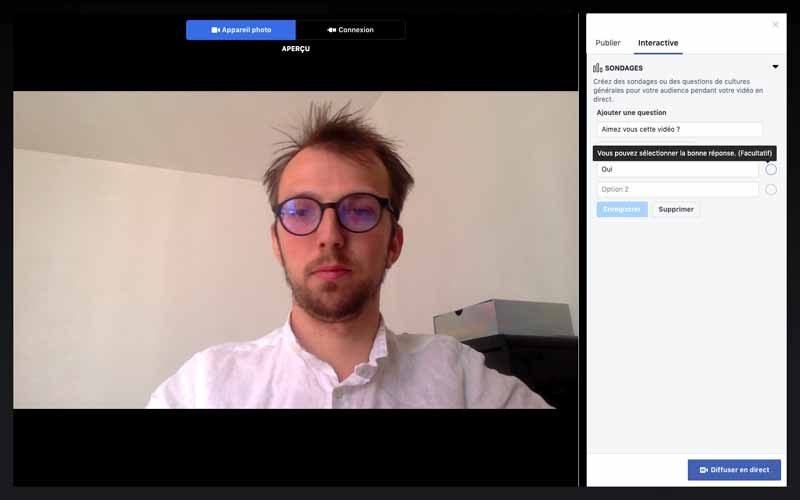
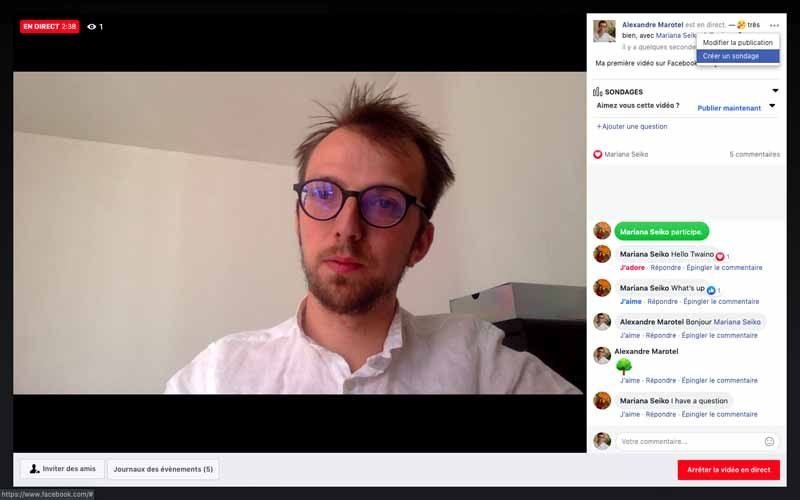
Propose to your audience to interact with you using a poll:


Step 5: Highlight your video on your page
Similar to broadcasting with a mobile device, you now have the ability to edit your video before posting it to your page. Additionally, you can make it more popular by pinning it to the top of your brand page so it’s the first post visitors see when they visit.
You’ve just finished your broadcast, but things are still far from over.
What to do after your Facebook Live: Take full advantage of your efforts
You’ve put a lot of effort into making your Facebook Live video, and even though your performance was excellent with thousands or millions of views, there’s always room for improvement. In other words, you’ll be promoting your video.
Step 1: Upload your video
The first thing to do after you finish your Facebook Live is to upload your video so you can use it in a variety of ways. For example, you can publish it on other platforms or review it to analyze your own performance to improve things next time.
To upload your video, simply click on “Publishing Tools” from your page menu.
(image)
Then, click on the “Videos” option located on the left column to see a list of videos posted on your page. Find your video and upload it in HD format to get the best quality.
Step 2: Publish your video on YouTube
You’ve uploaded your video, now it’s time to use it on other platforms to expand its reach. Post your video on YouTube and Vimeo or any other account you have on social networks.
Keep in mind that before posting a video on YouTube, you have the opportunity to edit your video. Don’t hesitate to use it if you want to make improvements to your video before it is published. Also consider creating a “Playlist” if you have a lot of videos to post.
Don’t forget that publishing videos regularly or creating a web series that you broadcast at a fixed time and day is a real advantage insofar as your subscribers will remember the recurrence of your publications. This will make them inclined to free themselves in advance to follow your broadcasts. Therefore, try to be really regular if you want to have consistent results.
Step 3: Promote your Facebook Live video
(image)
Your Facebook Live was a success and you want more people to have access to your video? You can use Facebook Ads which will allow you to promote your video to more than 2 billion users.
After that, you have to think about segmenting your target audience and reserve a budget to do your advertising, I will soon do an article and a video on the subject.
Nevertheless, note that to succeed in your campaign, you must determine the objective you want to achieve. This includes for example:
- To have more fans;
- To get more views;
- Getting more traffic on your site;
- Etc..
While promoting your videos, don’t forget to keep moderating the comments since your fans and new visitors or subscribers to your page will probably have questions that you need to answer.
Step 4: Take images or create GIFs
Tweets with GIFs or images generate 34% more engagement than tweets without visuals. You can take images or create GIFs from your uploaded video.
For images, simple screenshots may suffice, but for GIFs, you can use tools such as Gifcreator. Take a few screenshots in the desired order to create funny GIFs in less than two minutes to insert into your posts.
Using these visuals in your social media posts or in future blog posts is also a great way to promote your video.
Step 5: Integrate video into your blog and email campaign
Don’t just limit yourself to social networks, extend your reach with your website and email campaigns. To do this, get the “embed code” of your Facebook Live video and insert it into your different content.
Click on “Embed” in your Facebook Live video and copy the code provided. You will then use it in your blog post or in your emails. Finally, don’t forget to use it in your emails since the presence of the word “video” in the subject line of an email increases its click rate by 65% and its opening rate by 19%
.
How to analyze the performance of your live video?
You’ve done your Facebook Live, published the video on your page and on other platforms, but know that the work is not yet done. Now you need to analyze your performance.
To analyze your Facebook Live posts, go to the “Insights” tab at the top of your brand’s Facebook page:
(Image)
Then go to the “Videos” section located on the left sidebar.
(image)
Go to your “Video Library” to view all the videos your page has already posted and select the video you want to analyze.
(image)
Facebook Live video analytics features are similar to normal Facebook videos, but with a few additions.
Pre-recorded videos
Facebook allows you to have data such as:
- Minutes viewed ;
- Unique visitors;
- 10-second views;
- Average viewing time;
- Feedback;
- Number of comments;
- Number of shares.
Facebook Live videos
For live broadcasts, Facebook allows you to analyze all the metrics listed above, as well as :
- The maximum number of live viewers;
- Total number of views; and
- Average viewing time;
- People reached;
- Number of people with volume on or off;
- Demographics of the people who watched your video.
Best of all, you can click on each of the metrics to see how it changed over time when the video was live. You can even see who your typical viewer was during your broadcast with data like:
- Gender;
- Age range;
- Geographic location with the most viewers;
- Etc..
(image)
Best practices on Facebook Live: Guarantee your success!
To make your Live video a success, you obviously need to have a reliable internet connection. But in addition to this obvious tip, there are other valuable tips to know to make your Facebook Live video a success.
Tip 1: Space live videos with other Facebook posts
Although Facebook ranks live videos higher than other types of posts, I encourage you to space your Facebook Live videos with other Facebook content posts to maximize their organic reach and accessibility.
In fact, it would be a shame if your Live video recording ended up under a pile of posts just 24 hours after you broadcast.
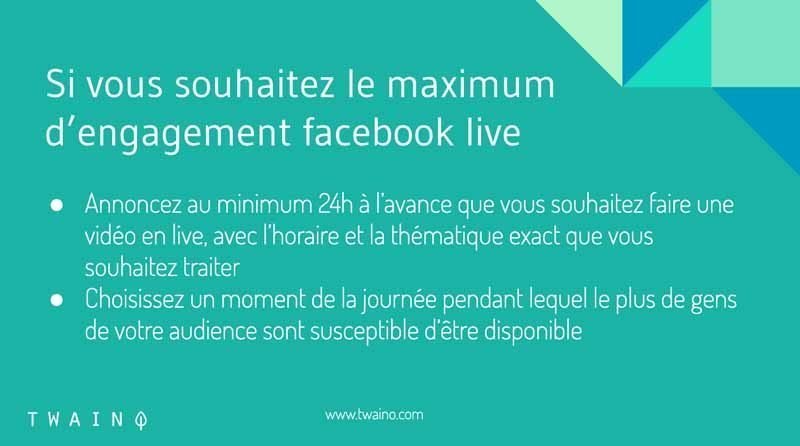
Tip #2: Promote your next Facebook Live video
If you want maximum Facebook live engagement:
- Announce at least 24 hours in advance that you want to do a live video, with the exact time and topic you want to cover ;
- Choose a time of day when the most people in your audience are likely to be available.
With these two tips, you’ll ensure that most of your audience is aware of your upcoming broadcast. This way you maximize your chances of getting more people.
Tip #2: Face your window!
If you’ve done it once, you know that when recording a video in the middle of the day with an open window behind it, it’s very difficult to enjoy the video. Since the sunlight is glaring and it is difficult to see the person presenting clearly. The same goes for your lights, if you have lights on, it’s wise not to have them behind you.
Always make sure you are facing the window if you don’t want to close it and your lamps if you don’t want to turn them off. This action allows you to get good light or appear clearly in your video.
(Two images for inspiration: ….
- Back window ;
- Front window)
Also, remove your glasses when shooting as they can also reflect light and be another source of glare.
Tip 3: Shoot horizontally on your mobile device
With the habit of using mobile devices vertically, it’s only natural to want to shoot the same way. But when you flip your phone horizontally, you have a much larger recording size.
Horizontal videos are more appealing, especially when displayed in the news feed.
(image)
However, you may very well use the vertical shot if the majority of your audience is likely to be on mobile. Especially since few people will actually switch to full-screen mode during Live.
Tip #4: Create a few test videos first
Before you go live, it’s a good idea to test things out by creating a private video that only you can see. To do this, go to your Facebook profile and select “Only Me” before making your recording.
(image)
This approach ensures that the recording will be perfect with the lighting and sound to match your expectations
Tip 5: Get personal
In order to make a more human connection with your audience, you can share with them some moments from your life. You’ll be able to reach them on a more personal level, which will strengthen your relationship with your audience.
You don’t have to go into details or share too much personal information like your social security number. You can talk about some of your personal experiences related to your topic.
For example, if you run a Facebook page where you cook, you can do a special live recipe for your child’s or parents’ birthday.
Tip #6: Smile, and be energizing!
Put on your best smile and communicate your liveliness to your audience. Once you are live, your performance should be flawless since there will be no turning back.
In fact, using a monotonous, unpleasant voice while selling your product may put everyone in the audience to sleep. But when you adopt an energetic and friendly demeanor, you will provoke positive feelings in your viewers. In short, speak with a smile and above all, be yourself.
Tip #7: Reintroduce yourself regularly
When you start the video, it’s important to take a minute to introduce yourself and explain what the video is about. Note, however, that you may not have any viewers at the start of your broadcast and it’s only a few seconds later that you’ll have a handful of viewers.
In fact, as people find your video in their news feed, they will join in. That means you’ll have to introduce yourself a second, third, and even fourth time to get newcomers up to speed on what you’re presenting.
You can introduce yourself:
- At the beginning;
- One minute after;
- About 6 to 7 minutes later; and
- 15 minutes after ;
- 25 minutes later;
- Etc..
Tip #8: Accept small mistakes
Have you stuttered on a word a few times? Or maybe you broke a plate in your Facebook Live cooking show? Be aware that mishaps are inevitable and can happen at any time, even in your Facebook Live video.
Keep in mind that it’s actually these things that make live video so much fun. Rather than being embarrassed and rushing to end the video, embrace your mishaps by making fun of the fact that you’re a professional chef who breaks plates. This will add personality to your video, and also help your audience see that you are a real human, with flaws, just like them!
Tip #9: Ask your viewers to interact
Posts with the most likes, comments, shares, and views are prioritized in the News Feed. Facebook’s algorithms recognize popular content and make it even more popular without you having to pay extra for more visibility.
Interaction on your videos gives them authority and allows new viewers to be reassured that the content is relevant. In order to get more interaction, it is advisable to simply encourage your audience to do so.
In addition, you can ask questions that you will ask your viewers to answer in the comments. Also, don’t hesitate to ask them to like and share, with perhaps the possibility of entering free sweepstakes.
Tip #10: Have someone monitor the comments and answer questions
Sometimes it can be difficult to make your video and respond to comments simultaneously. For this reason, you can solicit a colleague to respond to the comments in text form and prompt you to answer the most relevant questions during the live broadcast.
Tip 11: Call your speakers by name
During your live broadcast, answer questions by the first name of your speakers. Mentioning their names allows you to strengthen your relationship while giving the impression that you chose to answer their question specifically, which makes them feel special.
Tip #12: Make a sign to end well
Simply hitting the “End” button is not the best way to close your Facebook Live video. Instead, make an ending sign by waving one of your hands as a “goodbye” and to indicate the next step to your audience.
What do you want your viewers to do after your show? Tell them if you would like them to :
- Subscribe to your live video channel ;
- Visit your Facebook page to get a discount code;
- Share the recording on their page;
- Come back the same time and day for another episode;
- Etc..
Whatever the case, make sure you end your Facebook Live with something actionable for your visitors.
Tip #13: Use a custom thumbnail
The thumbnail of your video is the first thing that latecomers will see, and you need to make it compelling enough to generate clicks on the video.
After your live broadcast, you have the ability to make changes to your recording. To do this, simply click on “edit video”, and you’ll see a “Custom” icon, which will allow you to upload a custom thumbnail image.
(image)
Choosing a relevant, high quality image is what will give the best results as it will entice late viewers to watch your recording. You can also title your images to give Facebook an extra clue about the content of the video.
Tip #14: Display your post at the top of your News Feed
Facebook gives you the ability to pin your video like Twitter does with tweets. Don’t shy away from pinning and holding your recording to the top of your News Feed to get more interactions.
Tip #15: Add captions to your video
Sometimes watching videos without sound has become a habit for many people. In fact, it’s more convenient to do so when you don’t want to disturb those next to you or when you’re in a place where there’s a lot of noise. It is for either of these situations that you will make use of captions to make your video accessible to a wider audience.

Tip #16: Promote your video
Once your video goes live, you can boost your post and run an ad campaign just like on your other videos and Facebook posts. Take advantage of your audience targeting features to make your content available to a wider, relevant audience.
Tip #17: Analyze your results
After a few days, go to your “Insights” tab to evaluate the performance of your Facebook Live video. Facebook Live videos provide valuable information regarding the maximum number of live viewers, total views, average viewing time people reached, and demographics of who watched.
Using these metrics will help you continue to refine your Facebook Live video strategy in the future.
Facebook Live: A powerful marketing lever!
Since its launch in 2016, Facebook’s new tool has been generating excitement from both users and brands using the social network. This reflects the growing popularity of video content as statistics show that by 2020, video will represent
84% of internet traffic compared to the current 75%. This will represent a jump of nearly 95% since 2005. The question is no longer how important this content format is, but the new trend of live broadcasts from social networks. If you have a business, now is the best time to use Facebook to get a head start on your competitors and take advantage of the privilege that the American firm grants to this new type of content . To do so, follow the steps I listed in my article, taking into account the tips to perfect your different live broadcasts. Finally, consider promoting your recordings on other platforms with a regular analysis of your performance in order to constantly improve your performance
.
And you, what will be the topic of your first live broadcast on Facebook Live?

