With a worldwide share of 60.8%, there is no doubt that WordPress is the leader in its market. In fact, one of the reasons for this popularity is its ability to adapt to all types of projects, whether individual or collective. This means that you have the which means that you have the possibility to create as many collaborators as you want on your website so that they can help you in the execution of certain tasks. The creation is very simple and is done very quickly in a few minutes. In this article, I will have the opportunity to present you the different types of users. In this article and the video that accompanies it, I will show you all the steps that will allow you to create new users as well as the different roles that you can assign to them.
Create and edit a wordpress user
So for this, I made a quick presentation, so on powerpoint to show you the different elements I found:
The notion of user and role on WordPress
The WordPress user
On WordPress, a user is a person who has an account on the web site and who has the ability to perform certain actions depending on their role. In fact, WordPress uses the concept of “roles” to give the site owner control over what users can and cannot do on the site.
With this in mind, you can make tasks such as
- The creation of pages;
- Creating categories;
- Writing and editing articles
- Moderating comments;
- Managing other users;
- Themes and plugins management;
- Etc..
The role of the WordPress user
The role, on the other hand, is a set of tasks or features that you can assign to one or more people to one or more people. In this regard, WordPress offers six default roles default roles :
- Super Administrator he has access to all administration functions including those of a network of sites;
- Administrator administrator: He has access to all administration functions of a single website;
- Editor he can publish and manage articles, even those that are not his own;
- Author author: He can publish and manage his own articles;
- Contributor he can write and manage his own articles without being able to publish them;
- Subscriber he can only manage his own profile.
The role “Super Administrator” allows a user to perform all possible functions, as well as the role Administrator. This implies that everyone you give this role to can exercise the same power as you.
On the other hand, each of the other roles has a decreasing number of allowed capabilities. For example, the Subscriber role has only the “read” capability. Instead, consider that roles define the user’s responsibilities within the site.
However, keep in mind that the capabilities assigned to a role can be changed, i.e. you can add or remove certain capabilities. Similarly, you can introduce other roles with the privileges you want, besides those offered by WordPress. To do this, you should use plugins such as User Role Editor and Members.
The concept of “role” will be the subject of another article to see in more detail how to modify them and how to effectively assign roles to users of your website.
Why assign roles to users?
Being the owner of the website, your account is automatically considered as “Administrator” or sometimes “Super Administrator”, when there are several websites. This state of affairs is quite logical, but as soon as other people are going to manage the website with you, the question of role takes all its value.
Indeed, there are several reasons why you may want to involve other users on your website. For example:
- A community site;
- An online magazine;
- The site of a large company;
- The outsourcing of certain tasks;
- Etc..
To illustrate this, let’s assume you have a news website. Before registering in Google News, you would have to have several authors on your website with a list including the biography of each of them.
In this condition, your editors should have some rights on your website. Nevertheless, it is absolutely not necessary to give them all the power over your website. In fact, they just need to write articles and therefore they will have to be assigned the role adapted to this need.
On the other hand, it may happen that you are no longer on good terms with your collaborators afterwards. In this condition, you will not be safe from “malicious” behavior, especially if you have given administrator rights to everyone. For this reason, you can consider that role assignment protects you and secures access to your website.
Steps to create and modify a user on WordPress
In order for you to easily understand the whole process of creating a new user in WordPress, I will use the website of my SEO Agency Twaino.com.

In fact, my goal is to create a new user with the role “Editor” who will be able to :
- Add articles;
- Edit content.
On that note, let’s go!
1) Log in to your administration space
In order to create a user on your website, you should first access the WordPress console. To do this, fill in the code “…./wp-admin” at the URL of your website and validate in your browser.
By completing the code at the URL of my website, it becomes “https://twaino.com/wp-admin”.
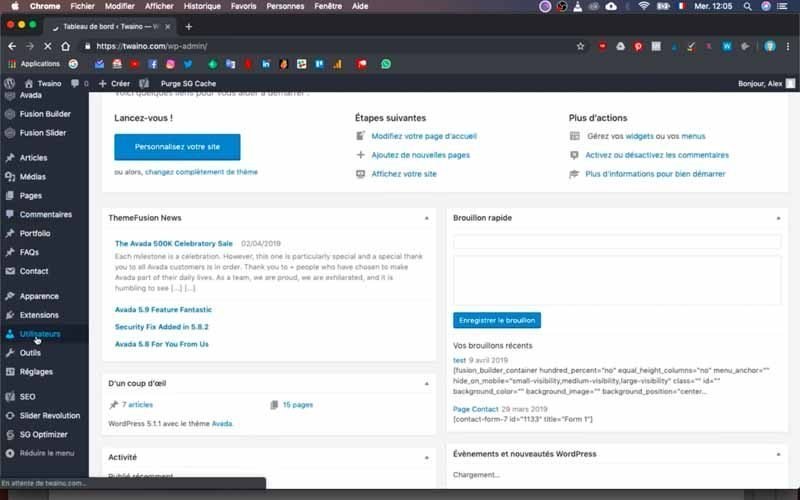
On the connection page that appears, take care to fill in the boxes with your identifiers.
Validate everything, which allows you to access the dashboard or administration space of the website.
2) Display all users
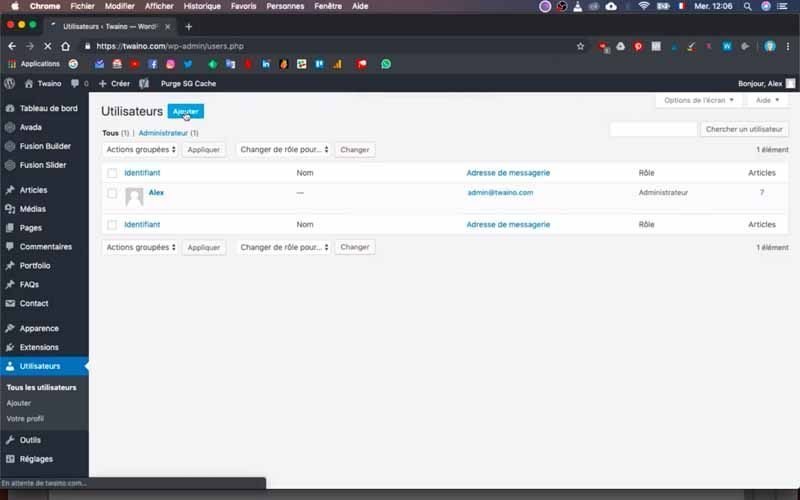
Once in the WordPress console, click on the “Users” section located on the left sidebar. On the interface that comes up, you have all the users of your website with information such as:
- User ID;
- Name;
- Email Address;
- Role;
- Article.
At my level, I am the only user and I obviously have the “Administrator” role.
3) Configure the information of the new user
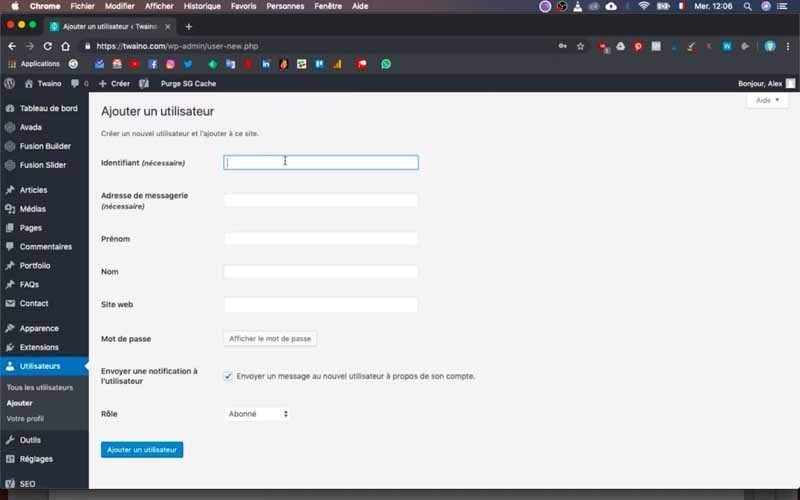
Click on the blue “Add” button at the top right next to the “Users” title on the page.
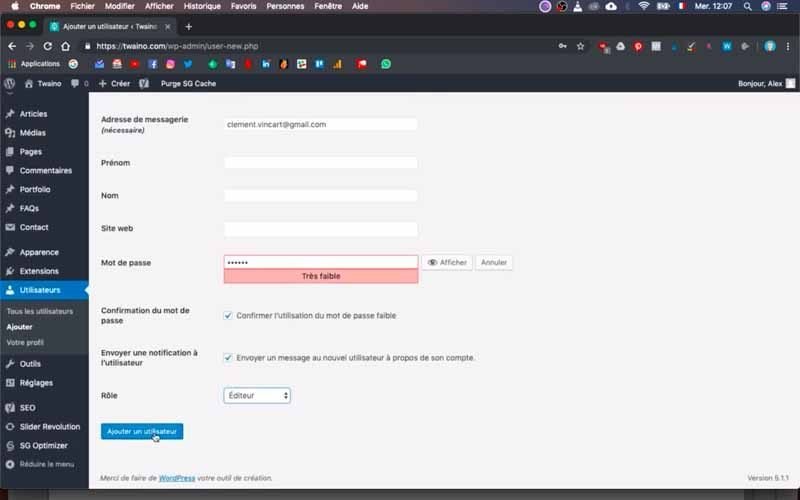
On the new “Add a user” interface, you will proceed to fill in the user’s information. In this case you need to provide:
- Identifier this field is mandatory and allows the user to connect to your website;
- Email address this field is also mandatory and will be used to send him his connection information for your website;
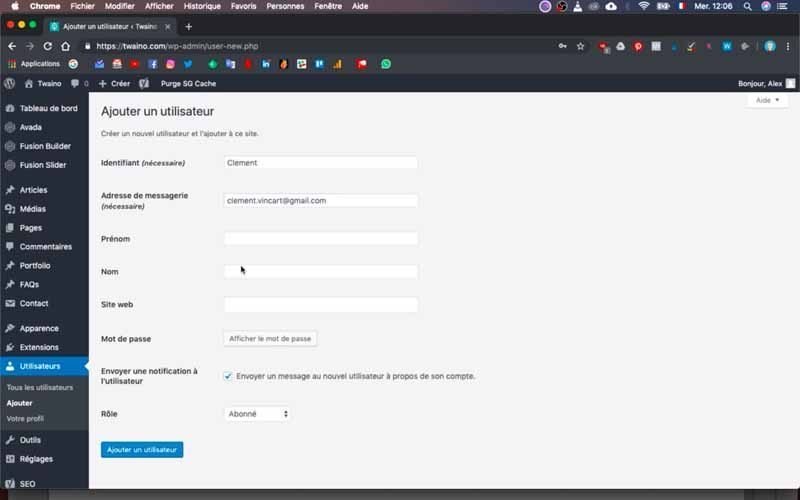
- First name first name: This is an optional field, it can be displayed on articles if the user has the rights to write;
- Name name: It has the same characteristics as the “First Name”;
- Website website: This is an optional field that allows you to display a link to your website in your profile;
- Password it will allow the user to connect to your website. In case the password you define is weak, check the confirmation option that will be displayed just below;
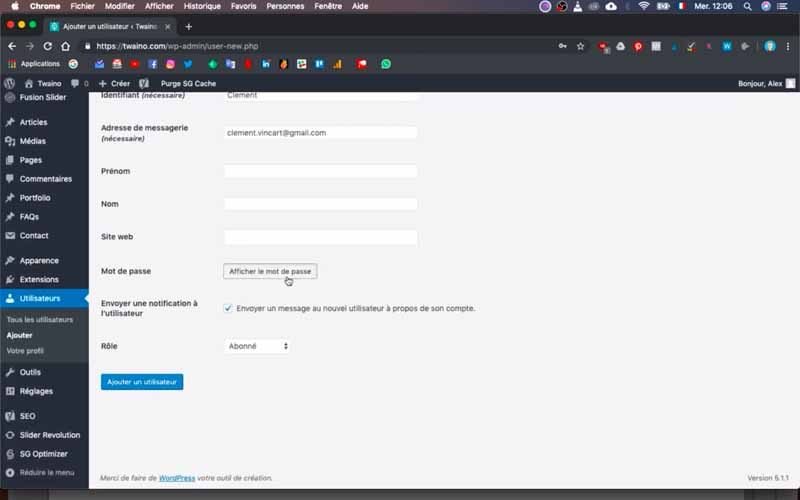
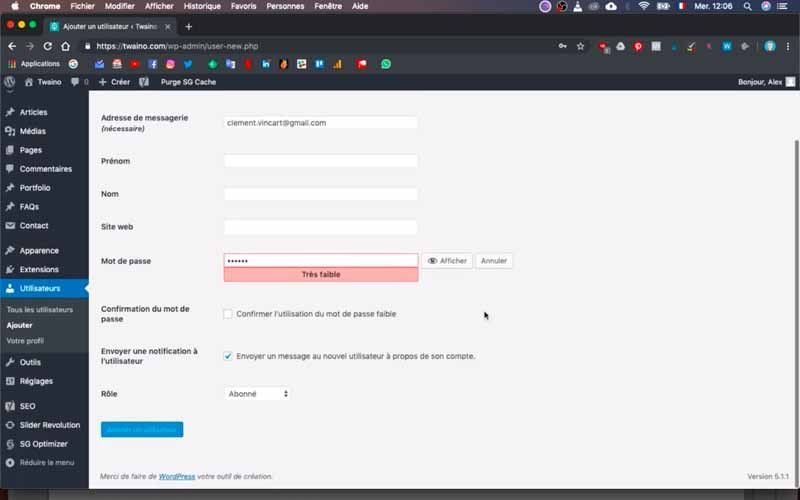
- Send a notification to the user send a notification to the user: This option is optional and allows you to send an email to the user that includes their User ID and Password. It is a good idea to leave this box checked so that the user will automatically get their information;
- Role allows the user to have certain privileges. For my site, I have SEO Editor, SEO Manager, Subscriber, Contributor, Author, Editor, Administrator.
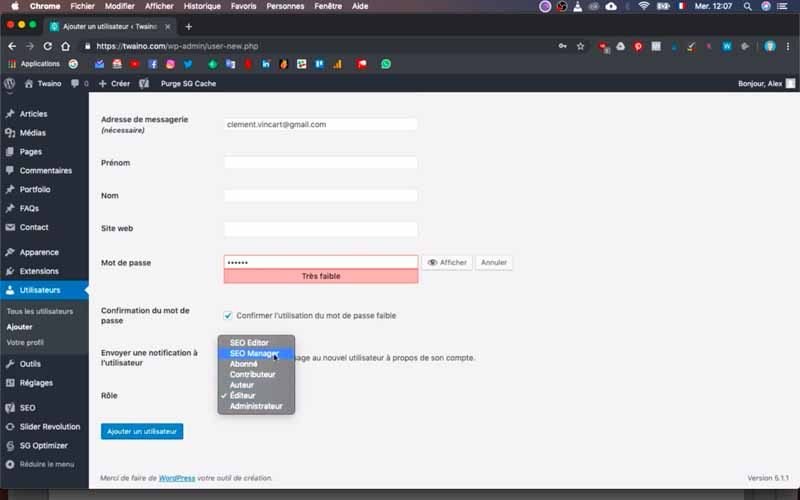
At my level, I add a new Editor “Clément” by taking care to fill in his login, his email address and his password, without filling in the optional fields.
4) Add the user
Once you have entered all the information, click on the blue “Add User” button in the lower left corner. You are then directed to the page with all the users where you have the new user’s profile added.
My profile was the only one to appear in the “User” section, but now there are two of us.
And that’s it! We have just created a new user and he will automatically receive an email if you have left the box “Send notification to the user”.
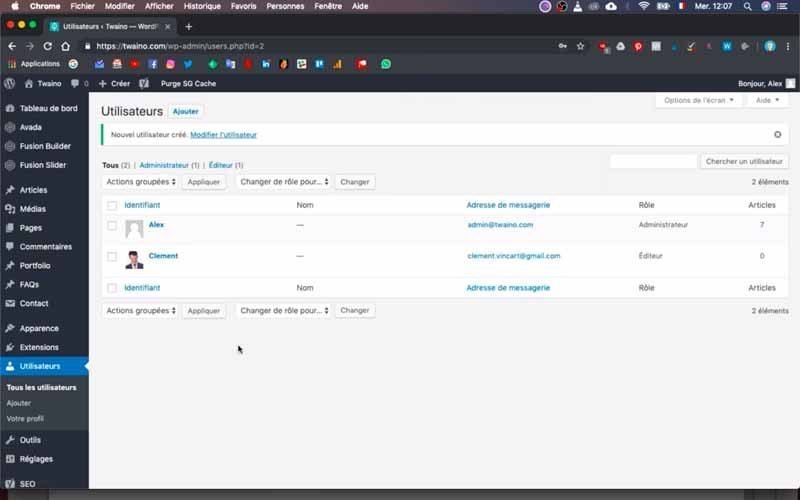
Therefore, they can already start logging in to your website.
5) Edit a user on your site
Editing a user on your website is just as easy, just go back to the interface of all users with the same principle as in step 2.
Then, click on the profile of the user you want to modify, which allows you to modify his login, his role, his password, etc..

Conclusion
Depending on your goals, you may need to get help from other people to manage your website. Especially since WordPress, which is the most popular CMS, adapts to almost all conditions including the management of a website by several people. But although the process of creating new users is very easy, it is very important to ensure that you correctly assign the role of each user in order to protect yourself and to secure your website. In this regard, the CMS offers different default roles from which you can choose. However, you can add other roles and in a future article I will show you the steps to follow and the best way to prioritize the roles to assign.
See you soon!


